


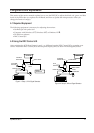


4-2-3 Adjustment Procedures
Use the following procedures whenever you
replace the AD Board, Panel, or one or both of the
Lamps.
4-2-3 (a) When Replacing the AD Board
1. Before replacing the AD Board, read all Panel
information data by using the Read button on
the DDC Control JIG.
2. Remove the old AD Board and replace it with
a new board.
3. Perform the procedures described in section
4-2-3 (b).
4. Write the Panel information data to the new
AD Board by using the Write button.
5. Perform other procedures using the DDC
Control JIG, if necessary.
6. When all procedures are complete, select the
Exit button ( ) to quit the DDC Control JIG
software.
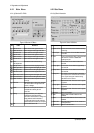
4-2-3 (b) Color Auto Adjustment
1. After displaying 16-Gray pattern or black and
white mixed pattern, click “Color Auto
Adjustment” button.
2. During normal execution of Auto Algorithm
the screen image may flicker. If Auto
Algorithm does not excute properly, check
DDC Control JIG.
3. After normal execution of Auto Algorithm,
confirm optimal settings by observing the
contrast of several different patterns on the
display.
4. If you want to check each color value, click the
button from to and from to
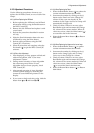
4-2-3 (c) When Replacing the Panel
1. Select the Read Buffer button ( ) to gather the
current information about this monitor.
2. Increment the number by clicking on the (+)
button on the Panel row in the Change No.
column. If they were not already 00, the
numbers for the Upper and Lower Lamps will
automatically change to 00.
3. Check all values. If there is an error, select
Read Buffer again and increment the Change
No. column to the correct number. When all
values are correct, select the Write button ( )
to record the data in the firmware.
4. Select the Return Menu button ( ) to Return
Main Menu.
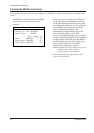
4-2-3 (d) When Replacing the Upper and/or Lower Lamp
1. Select the Read Buffer button ( ) to gather
current information about this monitor.
2. Increment the number by clicking on the (+)
button on the Lamp Upper and/or Lamp
Lower row in the Change No. column.
3. Check all values. If there is an error, select
Read Buffer again and increment the Change
No. column to the correct number(s). When all
values are correct, select the Write button
( ) to record the data in the firmware.
4. Select the Return Menu button ( ) to Return
Main Menu.
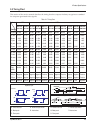
4 Alignments and Adjustments
SyncMaster 800TFT 4-3
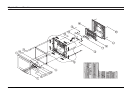
1
6 8 13
18
n
o
m
n
m
o