5
GB
Checking the Accessories Supplied
Overview
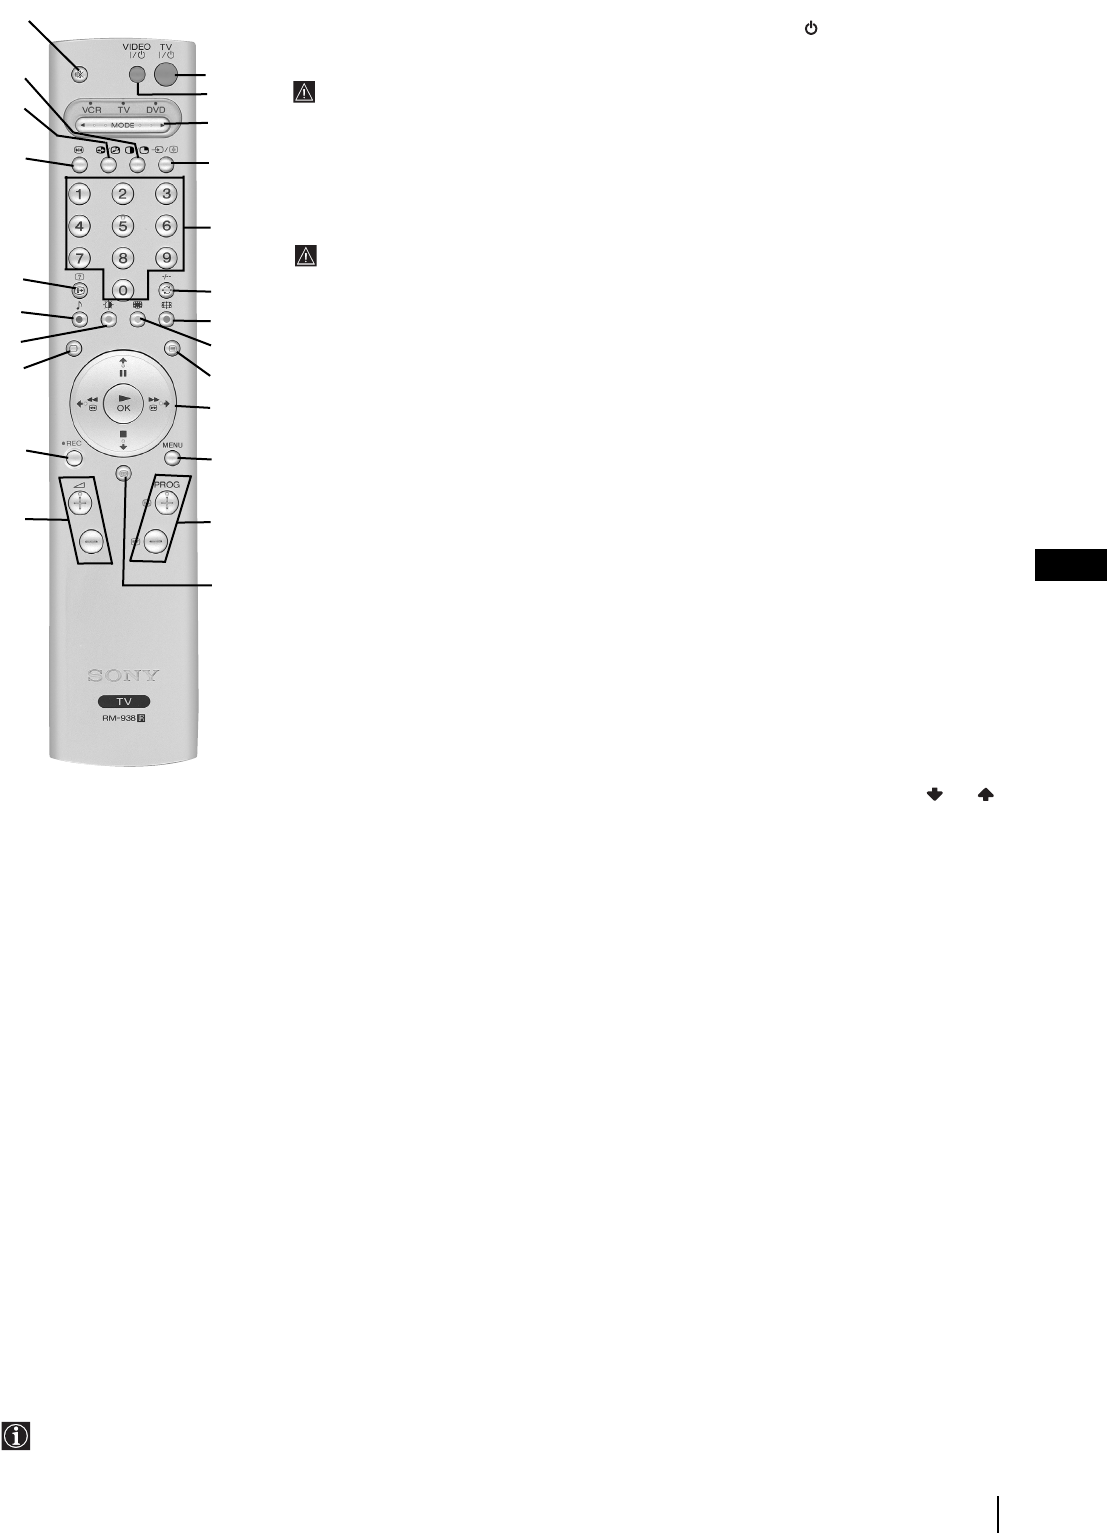
Overview of Remote Control Buttons
1
!¢
!™
!£
!¡
2
3
4
5
6
7
8
9
!º
!∞
!§
@£
@™
@¡
@º
!ª
!•
!¶
1
To Temporarily Switch Off TV:
Press this button to temporarily switch off TV (the standby indicator on the TV lights up). Press
again to switch on TV from standby mode.
To save energy we recommend switching off completely when TV is not in use.
After 15 minutes without a signal and without any button being pressed, the TV switches
automatically into standby mode.
2
VCR or DVD on/off:
Press this button to switch your VCR or DVD on or off.
3
Media Selector:
With this remote control you can operate not only this TV but also the main functions of your VCR
or DVD. Switch on the device you want to operate and next press this button repeatedly to select
the VCR, TV or DVD. A green light will be momentarily lit to indicate the chosen function.
Before the first time you want to control a DVD or VCR by using this remote control, you have
to set it up depending on the brand of the device to be used. For more details, refer to the
chapter “Remote Control Configuration for VCR or DVD” on page 23.
4
Selecting input source:
Press this button repeatedly until the desired input symbol of the
source appears on the TV screen.
5
Selecting channels:
If Media Selector is switched to TV or VCR, press this button to select channels.
For double-digit programme numbers, enter the second digit within 2.5 seconds.
6
a) If Media Selector is switched to TV:
Press this button to watch the last channel selected (the last channel watched for at least 5
seconds).
b) If Media Selector is switched to VCR:
For Sony’s VCR double-digit programme numbers, e.g. 23, press -/- - first and then the buttons
2 and 3.
7
Selecting screen format:
Press this button repeatedly to change the format of the screen. For
more details refer to the chapter “Auto Format” on page 13.
8
This button only works in Teletext mode.
9
Selecting Teletext:
Press this button to switch on teletext.
!º
Joystick:
a) If Media Selector is switched to TV:
• When MENU is switched on, use these buttons to operate the menu system. For details refer
to “Introducing and Using the Menu System” on page 10.
• When MENU is switched off, press OK to show a channel overview. Then press or to
select the channel and then press again the OK button to watch the selected channel.
b) If Media Selector is switched to VCR or DVD:
Using these buttons you can control the main functions of your VCR or DVD.
!¡
Displaying the menu system:
Press this button to display the menu on the TV screen. Press again to remove the menu display
from the TV screen.
!™
Selecting channels:
Press these buttons to select the next or previous broadcast channel.
!£
NexTView:
For more details refer to chapter “NexTView” on page 19.
!¢
Adjusting TV volume:
Press these buttons to adjust the volume of the TV.
!∞
Recording button:
If Media Selector is switched to VCR, press this button to record programmes.
!§
Selecting TV mode:
Press this button to switch off PIP, teletext or video input.
!¶
Selecting Picture mode:
Press this button repeatedly to change the picture mode.
!•
Selecting Sound effect:
Press this button repeatedly to change the sound effect.
!ª
Displaying on Screen information:
Press this button to display all on-screen indications. Press again to cancel.
@º
Freezing the picture:
Press this button to freeze the picture. The screen is divided into two screens. On the left with the normal
picture, on the right the picture is freezed. Press this button again to return to the normal picture.
@¡
Swapping screens:
Whilst you are in “PIP” mode, press this button to swap the two screens.
@™
PIP (Picture in Picture):
Press this button to watch another source in a small picture (PIP) within the main TV picture. Press again
to cancel. To select the source you want to watch, refer to the chapter “PIP Input” on page 14.
@£
Muting the Sound:
Press this button to mute TV sound. Press again to restore the sound.
Besides TV functions, all coloured buttons as well as green symbols are also used for Teletext operation. For more details,
please refer to the chapter “Teletext” on page 18.
03GBKP44PX2U.fm Page 5 Tuesday, January 14, 2003 4:29 PM
