


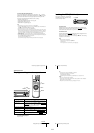


1-15
59
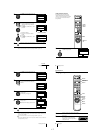
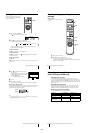
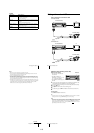
Searching for a selected point on the tape
To cancel searching
Press HPLAY or x STOP.
To turn off the bar indication
Press DISPLAY again.
Notes
• The figure on the bar indication represents the total time length of the inserted tape as shown
below.
The total time length may not be displayed correctly for:
– Tapes other than T-60, T-120, or T-160.
– Tapes recorded in more than one tape speed mode.
• If you move the pointer (
V) on the bar indication while searching, the VCR searches for the
new reset point.
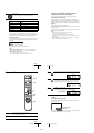
• With the bar indication on, the
M
FF/ , and
m
REW/ < buttons on the remote
commander work only for moving the pointer (V) and are not used for normal tape operation.
The
M
FF and
m
REW buttons on the VCR are used for normal tape operation. Note,
however, if you press these buttons on the VCR
, searching is canceled.
Tape type
Total time length
SP LP EP
T-60 or shorter 60 120 180
from T-80 to T-140 120 240 360
T-160 or longer 160 320 480
60
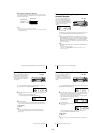
Adjusting the picture
Adjusting the picture
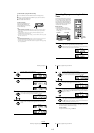
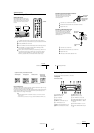
Adjusting the tracking
Although the VCR automatically adjusts the tracking
when playing a tape (the indicator flashes in the
display window, then turns off), distortion may occur
if the recording is in poor condition. In this case,
manually adjust the tracking.
Press TRACKING +/– to display the tracking meter.
The distortion should disappear as you press one of
the two tracking buttons (the indicator lights up).
To resume automatic tracking adjustment, eject the
tape and reinsert it.
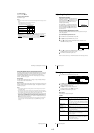
About the Reality Regenerator function
The Reality Regenerator function automatically restores the picture to its original
quality during playback.
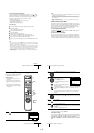
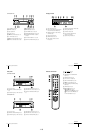
To use the Reality Regenerator function
To turn it off, select NO in step 4. The RR indicator turns off in the display window.
1
Press MENU, then select OPCIONES and press OK.
2
Press M/m to highlight PRÓXIMA, then press OK.
3
Press M/m to highlight REALITY REGENERATOR on PÁGINA2 of the
OPCIONES menu, then press OK.
4
Press M/m to set REALITY REGENERATOR to SI, then press OK.
The RR indicator lights up in the display window.
5
Press MENU to return to the original screen.
SEGUIMIENTO NORMAL
Tracking meter
OPCIONES
REALITY REGENERATOR
APC
SENSR CONDCIÓN CABEZA
NITIDEZ
NO
SI
ANTERIOR
VOLVER
AJUSTAR :
SELECCIONAR :
OK
MENUPARA SALIR :
2PÁGINA
61
Adjusting the picture
About the Adaptive Picture Control (APC) function
The Adaptive Picture Control (APC) function automatically improves recording and
playback quality by adjusting the VCR to the condition of the video heads and tape.
To maintain better picture quality, we recommend that you set APC to SI on
PÁGINA2 of the OPCIONES menu (The APC indicator lights up in the display
window). For details, see page 63.
APC playback
The APC function automatically works on all types of tapes, including rental tapes
and tapes that were not recorded with APC.
APC recording
Whenever you insert a tape and first start recording, the VCR adjusts to the tape using
the APC function (the APC indicator flashes rapidly). This adjustment is retained
until the tape is ejected.
Notes
• The auto tracking adjustment cannot be guaranteed to work with tapes recorded in the LP
mode on other VCRs.
• The APC function does not work if the tape speed is automatically changed from the SP to
EP mode during a timer recording when VEL. AUTO. CINTA is set to SI in the OPCIONES
menu, unless the tape has been recorded in the EP mode with the APC function.
• There is a delay of about ten seconds before the VCR actually starts recording while the VCR
analyzes the tape. To avoid the delay, first set the VCR to recording pause (the APC indicator
flashes slowly) and press
zREC to have the VCR analyze the tape (the APC indicator
flashes rapidly) and return to recording pause. After the APC indicator stops flashing, press
XPAUSE to start recording immediately.
If you want to start recording quickly without using the APC function, first set the VCR to
recording pause (the APC indicator flashes slowly) and press
XPAUSE again to start
recording.
62
Changing menu options
Changing menu options
Menu choices
Initial settings are indicated in bold print.
PÁGINA1
1
Press MENU, then select OPCIONES and press OK.
2
Press M/m to highlight the option to change, then press OK.
To go to PÁGINA2, highlight PRÓXIMA and press OK. To return to PÁGINA1,
highlight ANTERIOR and press OK.
3
Press M/m to change the setting, then press OK.
To adjust the sharpness, press </, and press OK.
4
Press MENU to return to the original screen.
Menu option Set this option to
SELEC. AUTO. ANT. • SI if your TV is connected only to VHF/UHF OUT on the
VCR. To play a tape, set the TV to the VCR channel (channel
3 or 4).
• NO if your TV is connected to both VHF/UHF OUT and LINE
OUT on the VCR. To play a tape, set the TV to the VCR input.
ESTEREO AUTO.
(SLV-LX70S and
LX60S only)
• SI to receive stereo programs.
• NO to reduce noise. The sound changes to monaural.
SINTONIZ. AUDIO
(SLV-LX70S and
LX60S only)
• MAIN to record the main sound on both hi-fi and normal audio
tracks.
• SAP to record the SAP (Second Audio Program) sound on both
hi-fi and normal audio tracks.
SELC. DE CINTA • AUTO when using a T-160 length tape or any tape shorter than
a T-140 length tape.
• 180 when using a T-140 or T-180 length tape.
For details, see page 36.
VEL. AUTO. CINTA • SI to change the timer recording tape speed automatically to
the EP mode when the remaining tape length becomes shorter
than the recording time. To operate VEL. AUTO. CINTA, set
SELC. DE CINTA correctly.
• NO to keep the same tape speed.
OPCIONES
ESTEREO AUTO.
SELEC. AUTO. ANT.
SINTONIZ. AUDIO
SELC. DE CINTA
SI
MAIN
SI
AUTO
VEL. AUTO. CINTA
SI
PRÓXIMA
VOLVER
AJUSTAR :
SELECCIONAR :
OK
MENUPARA SALIR :
1PÁGINA
OPCIONES
REALITY REGENERATOR
APC
SENSR CONDCIÓN CABEZA
NITIDEZ
SI
SI
SI
ANTERIOR
VOLVER
AJUSTAR :
SELECCIONAR :
OK
MENUPARA SALIR :
2PÁGINA
BA