


Advanced
49
•
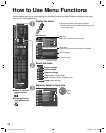
How to Use Menu Functions
●
“Reset to defaults” will be grayed out if no changes are made in the following menus:
“Picture”, “PC adjustments”, “Audio” and “Closed caption”.
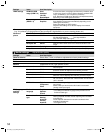
Picture settings
Adjust the image or picture quality
Settings Items Item Description
Reset to defaults
Resets all picture adjustments to factory default settings except for “Advanced picture”.
Picture mode Vivid
Provides enhanced picture contrast and sharpness for viewing in a well-lit room.
Standard
Recommended for normal viewing conditions with subdued room lighting.
Cinema
For watching movies in a darkened room. It provides a soft, film-like picture.
Custom (Photo)
Customizes each item according to your taste.
Photo is displayed in JPEG menu.
Game
For playing video games.
Back light Adjusts the luminance of the back light.
Contrast, Brightness,
Color, Tint,
Sharpness
Adjusts the color, brightness, etc. for each picture mode to suit your taste
• Display range Contrast/Brightness/Color/Sharpness : 0 - 100
Tint : -50 - +50
Color temp.
Cool/Normal/Warm
Selects a choice of Cool (blue), Normal, or Warm (red) color.
Color mgmt. Off/On
On: Enhances green and blue color reproduction, especially outdoor scenes.
A.I. picture Off/On
Controls dark areas without affecting the black level or brightness in the overall picture.
C.A.T.S. Off/On
Automatically adjusts the screen brightness according to the ambient lighting condition.
Video NR Off/On
Reduces noise, commonly called snow. Leave it off when receiving a strong signal.
• Some menus are grayed out depending on the input signal or condition.
(e.g. “Zoom adjustments” will be grayed out if the aspect is not set to Zoom.)
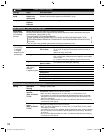
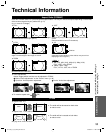
Aspect
adjustments
Screen format FULL/H-FILL/
JUST/4:3/ZOOM
Changes the format (aspect ratio).
Lets you choose the aspect depending on the format of
received signal. (p. 55)
HD size Size 1/Size 2
Selects between 95 % (Size 1) or 100 % (Size 2) for the scanning
area with High-definition signal.
Select “Size 1” if noise is generated on the edges of the screen.
●
Size 1: Selected item for “HD size”. Scanning 95 %
●
Size 2: Selected item for “HD size”. Scanning 100 %
H size Size 1/Size 2
Adjusts the horizontal display range to reduce noise of both side
edges of an image.
Size 2: Adjusts the image size according to the aspect mode to
reduce noise. (p. 55)
Zoom adjustments
Adjusts vertical alignment and size when aspect setting is “ZOOM”.
PC adjustments Reset to defaults
Resets PC adjustments.
Sync H & V
The H and V sync signals are input from the HD/VD connector. (p. 58)
On green
Uses a synchronized signal on the Video G signal, which is
input from the G connector. (p. 58)
Dot clock
Alleviates the problem if a picture appears to be vertically-striped, flickers partially or is blurred.
H-position
Adjusts the horizontal position.
OK
V-position
Adjusts the vertical position.
OK
Clock phase
Alleviates the problem if the whole picture appears to flicker or is blurred.
First adjust the Dot Clock to get the best possible picture, then adjust the clock Phase
so that a clear picture appears.
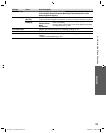
●
It may not be possible to display a clear picture due to poor input signals.
Input
resolution
Switches to wide display.
●
VGA (640×480 pixels), WVGA (852×480 pixels), XGA (1,024×768 pixels),
WXGA (1,280×768 pixels)
●
Options change depending on signals
H-frequency
V-frequency
Displays the H (Horizontal)/V (Vertical) frequencies.
Display range
Horizontal: 15 - 110 kHz
Vertical: 48 - 120 Hz
TC-L32_37_42_47E5_EN.indb 49TC-L32_37_42_47E5_EN.indb 49 4/23/2012 11:28:10 AM4/23/2012 11:28:10 AM