


5
• Double-click on the Control Panel icon.
• Double-click on the Printers icon in the Control Panel window.
• Highlight the STAR printer on LPT1 in the Installed Printers
window, and then click on Connect.
• Click on the serial port (COMn) to which the serial-to-parallel converter
is connected.
• Click OK to return to the Printers window.
• Click Close to return to the Control Panel window.
• Double-click on Ports, and the Ports dialog box appears.
• Click on the name of the port to which the serial-to-parallel converter is
connected.
• Click on Settings.
• Use the pull-down menu or directly type in the appropriate settings for
each of the parameters: Baud Rate, Data Bits, Parity, Stop Bits,
and Flow Control (protocol).
• Click OK to return to the Ports window.
• Click Close to return to the Control Panel window.
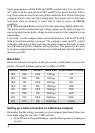
Setting up a serial connection on an MS-DOS computer
Remember that the settings you make on your computer must match those you
have made using the converter’s DIP switches.
• Modify your AUTOEXEC.BAT file so that it includes the following
line:
MODE LPT1:=COMn
This line tells the computer to send printer output to the COMn serial
port. The letter n stands for the number 1, 2, etc. You should input
COM1, COM2, etc. to identify the serial port to which the serial-to-
parallel converter is connected.
• Also add the following line to your AUTOEXEC.BAT file:
MODE COMn:baud, parity, data length, stopbits, p
This line sets up the COMn port according to the parameters you input
for baud, parity, data length, and stopbits. To set up COM2 for
9600 bps, no parity, data length of 8 bits and 1 stop bit, you should input
the following:
MODE COM2:9600,N,8,1,p
The letter “p” at the end of the line tells the computer that the printer will
continually try to re-send data whenever an error occurs. If you need
further information about the MODE command, see your MS-DOS
User’s Guide.