Instruction Manual
4
Using the menu system
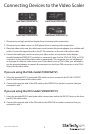
The video scaler automatically interprets the input resolution and scales it to the output
resolution selected in the menu system. While the default settings will provide an image, the
video scaler oers several settings that will allow you to adjust the output signal for the best
possible result.
NOTE: Changing the settings below may cause the signal to become unusable if the settings you
select are incompatible with your display. Should this occur, repeat the steps you followed under
“Selecting a video source” to reset the video scaler back to a compatible setting.
To activate the menu system, press the MENU key on the front of the video scaler once. The OSD
will display the available option on the lefthand side of the screen. To navigate the menu system:
1. Use the + and - keys on the front of the video scaler to movebetween options.
2. Use the MENU key to select an item to adjust or display a sub-menu.
3. Once an item is selected, use the + and - keys to adjust the setting.
4. When you are satised with your changes, press MENU to activate the setting.
5. You can continue to adjust other settings, or select Exit from the OSD menus until the OSD
disappears.
The following options can be adjusted from the OSD menu system:
Picture Adjust
Brightness
Contrast
Color
Tint
H. peaking lter
Sharpness
V. peaking gain
Reset
Exit
Display
Timing
C S C (RGBH/YPbPr)
Advanced
Film Mode (Auto/OFF)
OSD Display (ON/OFF)
No Signal (Blue/Black)
System Information
INPUT Mode
Display Timing
The video scaler will store your changes until it is reset to a default setting.