


– 4 –
EN
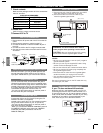
1) Connect one end of the DC cable to the 13.2 VOLT
(12V) DC connector on the back of the VCP.
2) Connect the other end of the DC cable to your
vehicle’s cigarette lighter socket.
WARNING: The driver should never watch a
video program while operating a motor vehicle.
CAUTION: After you finish using the VCP, unplug
the DC cable from the cigarette lighter socket.
NOTES:
• Be sure your vehicle has a 13.2 volt (12V), negative
ground electrical system.
• Be sure you use only the supplied DC cable. Using
another cord could damage the VCP.
• Be sure the socket is free of ashes and other debris.
• Be sure to push the DC cable, plug completely into
the cigarette-lighter socket.
• Disconnect the DC cable from the cigarette-lighter
socket first, before you unplug it from the VCP.
• You must disconnect the DC cable from the VCP
before you can use AC power.
Be sure to replace the fuse on the DC cable with only
the same type, 5A, 250V.
ACCESSORIES PART NO.
Coaxial Cable WPZ0901TM002
Remote Control Unit N9378UD
Batteries AA x 2
DC Cable WX1H35B4-001
1 Check contents
Make sure the package contains all of the accessories
listed in "as below".
2
Situate VCP
Place the VCP in a stable, horizontal surface.
3 Connect VCP to TV
SUPPLIED ACCESSORIES
USING OPTIONAL AUDIO/ VIDEO OUTPUT JACKS
VCP TO TV CONNECTION
1. Disconnect the AC power cord of the TV from the AC
outlet.
2. Disconnect the antenna or cable from the TV.
3. Connect the antenna or cable to the ANT. IN jack of
the VCP.
4. Connect the VCP to the TV using the coaxial cable.
5. Plug the AC power cords of the VCP and TV into the
AC outlets.
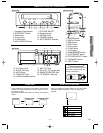
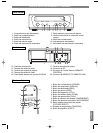
OUT
IN
ANT
[VHF/UHF
combination antenna]
[Back of the VCP]
IN
OUT
[Cable box or satellite box]
OR
[Indoor antenna]
[Back of the
UHF/VHF combination TV]
UHF/VHF
Coaxial cable
(supplied)
From Cable or
Satellite Company
OR
If your TV does not have A/V terminals:
When the VCP is in the Playback mode, your TV will
receive signals from the VCP on either channel 3 or 4.
To use the VCP with your TV, set the selector switch to
CH3 or CH4 (which is located in the back of your VCP),
whichever is not used for normal broadcasts in your
area. Then set your TV to the same channel.
CH3
CH4
[Back of the VCP]
ANT OUT
ANT IN
CH3
CH4
TV LINK
REMOTE
With this connection, you can get better pictures and
sounds when playing back a tape if your TV has A/V
Input jacks. Please refer to your TV’s owner’s manual.
PREPARATION FOR USE
SETTING THE CH3/CH4 SWITCH
USING THE DC CABLE
[ Back of the VCP ]
ANT OUT
ANT IN
AUDIO
CH3
CH4
VIDEO
OUTPUT
TV LINK
REMOTE
REMOTE
CONTROL
DC 13. 2V
To a cigarette lighter
socket
DC cable (supplied)
PREPARATION
FOR USE
REMOTE CONTROL JACK
You can control the VCP, connect 3.5mm dia. jack of
“Remote Control Sensor Wire” box (not supplied) when
the VCP locates remote cargo area or behind rear seat.
Instead of firing at the VCP, you can control its function
by locating “Remote Control Sensor Wire” box where it
is accessible to signal from remote control unit.
*You can’t use the remote sensor on the front panel of
the VCP when this jack is occupied.
TV REMOTE LINK JACK
Connect the VCP to the TV (Funai TV) using the “TV
Remote Link cable” (not supplied).
Instead of firing at the VCP, you can control its function
using remote control sensor on your TV (Funai TV).
*You can’t use the remote sensor on the front panel of
VCP when this jack is occupied.
*When you connect both REMOTE CONTROL jack and
TV REMOTE LINK jack at the same time, REMOTE
CONTROL jack takes precedence over the TV
REMOTE LINK jack.