


7
Connections and controls
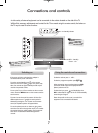
If the power-on light is unlit check the adaptor is
connected and the power switched on.
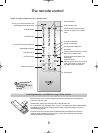
To put the set into Standby press
i
on the remote
control. To view the TV press
i
again. The picture may
take a few seconds to appear. Standby should only be
used for short periods of time.
To set up the TV you will now need to use the on-screen
menus. Press the MENU button on the remote control to
see the menus.
The menu bar at the top of the screens will show five
different topics shown in symbols. As each symbol is
selected by pressing the
S
or
R
button on the remote
control, its respective options will appear below.
To use the options press the Q button on the remote
control to move down through them and
S
or
R
to select
the required choice or adjust a setting. The functions of
each menu are described in detail throughout the
manual.
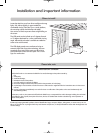
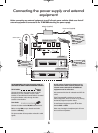
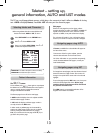
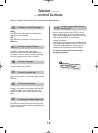
A wide variety of external equipment can be connected via the sockets located on the side of the TV.
Whilst all the necessary adjustments and controls for the TV are made using the remote control, the buttons on
the TV may be used for some functions.
To alter the volume press — j+.
To alter the programme position press
ee
F
ff
.
When connecting mono sound equipment to EXT2,
connect the audio output of the equipmenttothe
L(Mono)socket onthe TV.
To select the Input, press
B
until the display shows
EXT1 as described on page 10. The TV will automatically
sense the type of signal.
Please always refer to the owner’s manual of the
equipment to be connected for full details.
Switching on Using the controls and connections
DO NOT connect a
standard video cable
AND an S-Video cable to
EXT 2 at the same time.
☛
Standby Button
RED – Standby
Green – On
DO NOT connect equipment
to both the side
B
2 terminals
at the same time.
!