5
25
ADJUSTING THE PICTURE SETTINGS
Your TV display can be adjusted to suit your preferences and
viewing conditions.
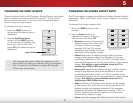
To adjust the picture settings:
1. Press the MENU button on the
remote. The on-screen menu is
displayed.
2. Use the Arrow buttons on the
remote to highlight Picture and
press OK. The PICTURE menu is
displayed.
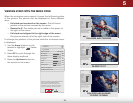
3. Use the Arrow buttons on the
remote to highlight Picture
Mode, then use the Left/Right
Arrow buttons to change the
picture mode:
• Standard mode sets the
various picture settings to
values that meet
ENERGY STAR
®
requirements.
• Calibrated mode sets the
picture settings to values
perfect for watching TV in a
brightly-lit room.
• Calibrated Dark mode sets the picture settings to values
perfect for watching TV in a dark room.
Changes made while a preset picture mode is
selected are automatically saved as a new custom
picture mode (see Custom Picture Modes on pages
30 through 32
). Automatically-created custom
picture modes are given generic names, beginning
with "Custom 1."
Help
VIZIO
Network
Sleep
Timer
Input CC
ABC
Audio
Wide
Normal
Picture
Settings
PanoramicWide Zoom
2D 3DExit
PICTURE
Picture Mode Standard
Backlight 85
Brightness 50
Contrast 50
Color 59
Tint 0
Sharpness 9
Advanced Picture
Professional Picture
-
+
+
-
-
+
-
+
-
+
-
+
Select from preset picture modes. Standard
picture mode meets ENERGY STAR
®
requirements. For the best picture, use
Calibrated mode. To reduce video delay
(lag) when gaming, use Game mode.
• Vivid mode sets the picture settings to values that
produce a brighter, more vivid picture.
• Game mode reduces throughput delays and optimizes
the picture settings for displaying game console output.
• Computer mode optimizes the picture settings for
displaying computer output.
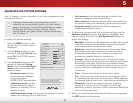
4. To manually change each of the picture settings, use the
Up/Down Arrow buttons on the remote to highlight that
picture setting, then use the Left/Right Arrow buttons to
adjust the setting:
• Backlight - Adjusts the LED brightness to affect the overall
brilliance of the picture. Backlight cannot be adjusted
when starting from some picture modes.
• Brightness - Adjusts the black level of the picture. When
this setting is too low, the picture may be too dark to
distinguish details. When this setting is too high, the
picture may appear faded or washed out.
• Contrast - Adjusts the white level of the picture. When
this setting is too low, the picture may appear dark. When
this setting is too high, the picture may appear faded
or washed out. If the setting is too high or too low, detail
may be difficult to distinguish in dark or bright areas of
the picture.
• Color - Adjusts the intensity of the picture colors.
• Tint - Adjusts the hue of the picture. This setting is useful
in adjusting the flesh tones in the picture. If flesh appears
too orange, reduce the level of color before adjusting tint.
• Sharpness - Adjusts the edge sharpness of picture
elements. It can be used to sharpen non-HD (high
definition) content; however, it will not produce detail that
does not otherwise exist.
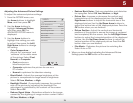
5. When you have finished adjusting the picture settings, press
the EXIT button on the remote.


