


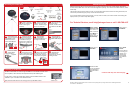


of the IAB have been
inserted into the two
holes in the LNBF arm.
2
1
support assembly
LNBF arm
Connecting to the Receiver
“Satellite In” port
the unit onto the tripod
mast. Re-insert the mast
clamp bolts, and tighten.
an available LNBF Output
Port.
the reflector with the four
holes on the support
assembly.
IAB, which slants
upwards, and the bottom
of the IAB onto the LNBF
arm.
holes on the front of the
reflector. Thread a flange
hex nut on each bolt.
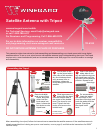
Parts
Assembling the Satellite Dish
1 2 3
Line up the four
holes on the back of
Insert a carriage bolt
into each of the four
Setup instructions.
Tighten all hex nuts after
pointing the dish.
9 10 11
Thread the two IAB
screws through the
Remove the mast
clamp bolts, and slide
Continue with the
DISH Receiver
through the LNBF arm of
the support assembly.
5 6 7
Insert the two IAB
bolts through the
Feed the RG-6
coaxial cable
Screw the RG-6
coaxial cable onto
8
Connect the LNBF
and the IAB by
4
Check that the two
posts on the bottom
IAB hex nut (2)IAB screw (2)
carriage bolt (4)
LNBF
satellite reflector
integrated adapter
bracket (IAB)
flange hex nut (6)
extra IAB screw
mast clamp bolt (2)
IAB bolt (2)
holes
holes
hex nuts
hex nuts
posts
holes
bottom
of IAB
coaxial cable
LNBF arm
IAB screws
bottom
of IAB
mast clamp
bolts removed
Pull apart the IAB.
Place the top of the
two holes on the bottom
of the IAB and through
the feed arm. Thread one
IAB hex nut on each bolt.
pushing the parts
together.
holes on the bottom of the
IAB and through the LNBF.
50’ RG-6
coaxial cable
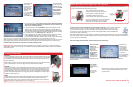
The RG-6 coaxial cable now runs through the LNBF arm of the satellite antenna. Items
such as splitters, video switches, and wall plates will stop the satellite signal.
For this reason, connect the coaxial cable directly from the satellite antenna to the
“Satellite In” port on the back of the satellite receiver.
Then, follow the instructions on the next page to set up the DISH receiver.
LNBF output
port
Disclaimer: Receiver setup instructions are accurate at time of printing and may change without notice. Call Winegard tech line
for assistance: 1-800-788-4417.
3
DISH Receiver Setup
DISH receivers will often not show when they are on signal if they have incorrect “Check Switch” information.
For this reason, DISH users must clear current settings before pointing. To do this for most DISH receivers, follow
these steps.
The following instructions are based on a ViP
®
211 receiver. Note that if this is the first time using the receiver, the
receiver may automatically jump to step 4 of the instructions below.
If your receiver differs from the options shown, you may need to consult your receiver manual. The wording and
display used in your receiver may differ slightly.
Check that there
are no checkmarks
by SuperDISH or
Alternate. Select
Test.
Select option 1,
Point Dish.
Select Check
Switch.
If this is the first
time using your
receiver, your
receiver may
automatically
start with this
step.
Before starting,
disconnect coax
from “Sat in” on
back of receiver.
Press Menu on
your remote.
Select option 6,
System Setup.
Select option 1,
Installation.
For Technical Services, email help@winegard.com or call 1-800-788-4417
2
4
1
3
5
Continue with step 6 on the next page.