


4 5
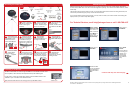
1) In the first column, input zip code of current location. Note that whenever
you move the satellite antenna to a new location, you must enter the zip
code of your new current location.
2) In the second column, choose Dish 500. With this option selected, use the
angles on the screen as a starting point for pointing your satellite dish. The
actual angles for pointing your dish will be slightly different than those shown
on screen; make small adjustments until getting the signal as high as possible.
3) In the third column, use Transponder 11 for Satellite 119.
4) In the fourth column, the satellite should be whatever satellite you want to
point at. Satellite 119 is the primary satellite, and the majority of
programming is located here. Satellite 119 should be used for initial aiming.
Note: If using a 311 or previous model receiver, select Peak Angles to enter your satellite and zip code.
With all information entered, an azimuth, elevation, and skew angle will be displayed under the four columns. Record
these angles. Now, follow the instructions below to point the dish using the azimuth, elevation, and skew angles.
Continue with step 9 of receiver setup after successfully pointing the dish.
8
IMPORTANT NOTE: The most accurate way to determine the look angles for a location is to refer to the Pointing
Angles Chart located in the back pages of the Installation Guide for the DISH 1000.2 antenna, which is included with
this satellite system.
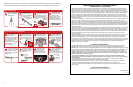
Adding Skew Bolts for Skew Angles above 110° or below 70°
If the skew angle of your DISH satellite antenna is above 110° or below 70°, loosen the two skew bolts on the
elevation and skew bracket. See image to the right.
Then, rotate the elevation and skew
bracket until the red mark on the bracket
lines up with the desired skew angle.
Two additional skew holes should
now be visible in the degree adjustment arc.
Insert two carriage bolts into the two additional
skew holes. See image to the left. Thread a
flange hex nut onto each bolt, and tighten.
elevation and
skew bracket
skew bolts
to loosen
bolts in
additional
skew holes
degree
adjustment
arc
Elevation
Loosen the elevation bolts on either side of the elevation and skew bracket. Raise the dish
to the specified elevation angle that you found in step 8 of the receiver set-up. The red line
on the elevation and skew bracket should line up with the correct angle stamped into the
support assembly.
After raising the dish to the correct elevation angle, tighten the nuts on the elevation bolts.
Refer to the instructions on the next page if having trouble finding a satellite.
Azimuth
Loosen the mast clamp nuts. Standing directly behind (but not too close to) the unit, align
the compass so that it points towards North. Refer to the specified angle that you found
in step 8 of the receiver set-up. Adjust the unit so that it points in the general direction of
the specified angle. Then, slowly rotate the dish 1° at a time, pausing for a few seconds to
monitor the signal strength before moving again. Repeat until finding the strongest signal.
Tighten the mast clamp nuts.
Skew
Loosen the skew bolts. Rotate the elevation and skew bracket until the red mark, shown
beside the skew bolt, lines up with the specified skew angle. Tighten the skew nuts.
If the skew angle is above 110° or below 70°, follow the instructions on the next page for
adding skew bolts for skew angles above 110° or below 70°.
Pointing the Satellite Dish
mast clamp
bolts
elevation
bolt
Press Cancel
four times to
exit the receiver
menu.
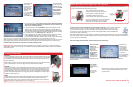
The receiver
set-up is now
complete.
11
Now return to
steps 4 and 5
to run another
Check Switch
test. The result
should be what is
shown here.
If you are missing
any satellites or
have low signal
on a satellite, the dish will need to be adjusted.
10
You are now ready to watch TV!
If you do not come across a satellite on your first attempt at pointing, you may need to change the
elevation angle up or down a couple of degrees. Continue to make slow scans of the sky until
you locate the satellite. Once you find the satellite, make slight adjustments to both the elevation
and azimuth to get the signal as strong as possible. A Winegard satellite compass (SC2000 sold
separately) can help with this step.
After making adjustments so that the signal is as strong as possible, tighten the azimuth nuts to prevent the satellite
dish from rotating. Keep in mind that buildings, vehicles, people, trees and various other obstructions can weaken or
block the signal from the satellite.
After successfully pointing the dish, continue with step 9 of receiver setup.
SC 2000
Sold Separately
Once accurately
pointed, the
signal meter will
turn green.
Make small
adjustments to
get the signal
as high as
possible. Check
that the bar at
the bottom of
9
the screen is green and that the satellite displayed is the
desired satellite.
The receiver will
go through a
number of steps
and then may
warn that fewer
satellites were
detected.
If so, select Save.
It may ask you to
confirm. If so,
select Save again.
This should clear
out any previously
installed devices.
Then, select Done.
Re-connect the
coaxial cable to
the “Satellite In”
port on the back
of the receiver.
6
7
As the receiver is acquiring signal, it will complete a
number of steps and then will download your new
program guide.
skew
bolt