2
IR-DC4
CAUTION: While the RC68 will operate as a separate remote
control, it is highly recommended it
not
be given to the final user for
the following reasons:
• Since it includes adjustable code settings, the user may inadvertently
alter the installer configurations.
• Also, since the user will require IR commands from other brands of
equipment to control the total system, in addition to those of the DC4,
all commands should be consolidated into one learning device, for
ease of use.
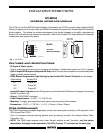
RC68 Button Descriptions
1. IR Emitter Lens.
2. IR command assignments for the DC4 (32 total). Refer to the
Arrakis DC4 users manual for command definitions.
3. Code Group Numbers. These numbers, on the top surface of
each button, apply to other Xantech products. Ignore for this
application.
RC68 Code Switches - Settings
Three different IR code settings are needed to operate the 3 player
zones of the DC4. To set the RC68 for the desired IR code, proceed as follows:
1. Rotate the upper switch, on the rear of the RC68 to D. Refer to Fig. 3.
2. Rotate the lower switch to 1, 2, or 3, as needed. See below:
D-1 for Digilink 4's Player 1
D-2 for Digilink 4's Player 2
D-3 for Digilink 4's Player 3
VOLUME
BASSTREBLE
1
2
34
INPUT
ON OFF
BALANCE
ABC
5678
GLOBAL
Z-ADJ
OFF
E-FLAT LAST MAX-V TRIM
MUTE
48
01 90
A0 30 B0
20 E0 70 F0
60 88 18 98
08 A8 38 B8
28 E8 78 F8
68 C8 58 D8
10
00 C0 50 D0
40
RC68 PROGRAMMER
F
1
2
3
4
5
6
7
8
1 2 3 PLAY
456STOP
7 8 9 PAUSE
CD# 0 TR# RESUME
DISC -- DISC + TR -- TR +
1 CD ALL CD SEQL RANDOM
ARTIST TITLE NUMBER ZONE
LEFT RIGHT ENTER SELECT
1
ROW
NUM-
BERS
Place the
"F"
Overlay
on the
RC68
2
3
Fig. 2 RC68 with "F" Overlay
0
1
2
3
4
5
6
7
8
9
A
B
C
D
E
F
0
1
2
3
4
5
6
7
8
9
A
B
C
D
E
F
0
1
2
3
4
5
6
7
8
9
A
B
C
D
E
F
10 48 01 90
0
1
2
3
4
5
6
7
8
9
A
B
C
D
E
F
1st Digit
(Upper)
2nd Digit
(lower)
RC68
(back
side)
Fig. 3 Setting the RC68 Code Switches
INSTALLATION
Fig. 4 illustrates a basic IR control system in which the IR-DC4 permits direct IR control of the Digilink 4.
Make connections as shown, keeping the following in mind:
1. Be sure to add a small jumper between the IR GND and PWR GND on the IR-DC4 as shown. This
provides a ground return for the IR signal coming from the CB12 Connecting Block.
2. Plug the 781RG Power Supply and the power plug of the DC4 into AC wall outlets only after all other
connections have been made.
3. Use the RC68 to teach a learning remote the commands for each of the DC4 players.
Fig. 5 is a typical multi-room version of a direct IR control system for the Digilink 4. In this case, Xantech
Smart Pad
2
keypads are used as well as IR receivers. The system is configured as follows:
1. The DC4 is the audio music source in the system using an A/V receiver, along with other A/V sources.
2. A 789-44 four-output Connecting Block is used so that other system components can be IR controlled
in addition to the DC4. If even more components need to be controlled, a ten-output amplified
connecting block, model 791-44, could be used.