


1-12
C
H
A
P
T
E
R
1:
G
E
T
T
I
N
G
S
T
A
R
T
E
D
Installation
Siting
the OfficeConnect Remote
When siting the OfficeConnect Remote, ensure:
■
It is accessible and cables can be easily connected.
■
It is out of direct sunlight and away from sources of
heat.
■
Cabling is away from:
■
Sources of electrical noise, such as radios,
transmitters and broadband amplifiers.
■
Power lines and fluorescent lighting fixtures.
■
Water or moisture cannot enter the case of the unit.
■
Air flow around the unit and through the vents in
the side of the case is not restricted. We recommend
that you provide a minimum of 25mm (approx. 1
inch) clearance around the unit.
To prolong the operational life of your equipment:
■
Never stack
OfficeConnect
units more than four high
and ensure that they are clipped securely together.
■
Do not place objects on top of any unit or stack.
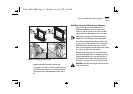
Using the Rubber Feet and Stacking Clips
The four self-adhesive rubber feet prevent your hub
from sliding around on your desk. Stick the feet to
the marked areas at each corner of the underside of
your hub.
The four stacking clips are used for neatly and
securely stacking your OfficeConnect units together.
You can stack up to a maximum of four units.
Large units must be stacked below small units.
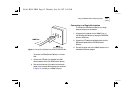
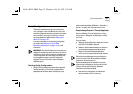
To stack your units, secure the clips on one side and
then on the other. Use the following method to
secure one side:
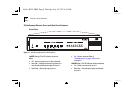
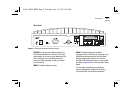
1
Place your new unit on a flat surface. Your clips fit in
the positions on the side of the unit, as shown in
Figure 1-3
(1).
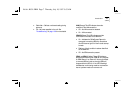
2
Position a clip over one of these holes and push it in
until it clicks into place, as shown in
Figure 1-3
(2).
Repeat this for the other clip position on the same
side.
3
Keeping the front of the units aligned, rest the
bottom of the new unit on the clips’ spikes, as shown
in
Figure 1-3
(3). Push the clips firmly into the new
unit until they click into place.
Rc.bk : RC01.FRM Page 12 Thursday, July 10, 1997 9:53 AM