


5 6
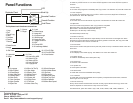
Technical Support:
Hours: 8:30 am - 6:00 pm PST
Phone: 408-453-6212
Email: http://www.addonics.com/support/query/
9. Image
Function#9 Image is valid only when a hard disk is installed. Disc is loaded to hard disk as an
image file.
9.1 Load
Load function loads whole disc data from any writers into the current partition of the hard disk.
“P:A” means current partition is A.
9.2 Delete Image
If you want to delete an image file stored in a particular partition, you can use this function to
delete image. Press ENT , the system will confirm with you for the action, use ▲ ▼ to select Yes or
No, then press ENT for confirmation.
9.3 Image Info
To check selected image information. First, enter into the function and press ▼ for more
information.
9.4 Compare Image
This function is used to check if created image is identical to source disc.
When result shows on LCD, press ENT for more detail information.
Compare result :
OK: Source and target disc are identical
Fail: TOC not match, compare skipped due to contains not match.
Diff: shows how many bytes are different.
9.5 Select Image
This function is to select a partition as source image from the hard disk. Pressing ▲ ▼ to select a
partition, LCD will show image name and capacity.
9.6 Image Src Drive
This function is used to set the image source drive for loading disc data into a particular partition.
Enter into the function and use ▲ ▼ to select image source drive.
9.7 ImageFormat Info
This function shows which format is used for current hard disk. It is related to function#12.4 Format
HDD.
9.8 Edit
This function is to edit selected image's title, sub1 title and sub2 title. Only valid when the current
partition contains an image file can title. A title should be composed of 1 to 13 characters. The
character can be alphabet, number or the combination of both. Use ▲ ▼ to select the number or
alphabet. After selecting a desired one, press ENT for next character, the end of key in, press and
hold ENT for 2 sec and release for next title.
9.9 Format HDD
Hard disk must be formatted by the system for the very first time. Hard disk will be partitioned into
the chosen partition format. If no hard disk is installed, LCD will show the message as No Valid HDD!
All data on the hard drive will be erased after the hard disk format. After the hard drive is formatted
correctly, LCD will show “ Format HDD ok!.”, Press ENT to verify HDD or press ▼ and choose No return
back to menu.
9.10 LoadImage Method
This function is to change the way to save Image. There are 2 formats for choice: Auto and Manual.
Auto means system auto assign partition for loaded image. Manual let you to choose which partition to
load image to.
10 Edit Track (for Audio CD only)
Function#10 Edit Track is exclusively designed for editing a collection of favorite songs from CDs. In
other words, you can collect songs on a number of CDs and merge them into a single CD. There are 3
sub-functions: CD to CD, CD to HDD and Close Session.
10.1 CD to CD Edit
To select songs from source CD, and then burn into a blank CD-R/RWs.
You can press ▼ to see the rest of tracks. If you want to select the track, press ENT then a “+” will
shows up, press ENT again will cancel the selection. After selection, use ▲▼ move to the “End” which
is between 1st track and last track. Press ENT to end of selection, and use ▲ ▼ to confirm Yes or No.
Press ENT after burning, system will ask if you want to continue edit, use ▲ ▼ to confirm Yes or No. If
you want to continue edit, the current source CD will be ejected and ask you to insert next disc. Repeat
the above process for editing.
After editing, system will show ''Close all disc's session ? Yes”, use ▲ ▼ to confirm Yes or No.
Once session is closed, no more tracks can be added.
Attention:
Commercial audio player might not able to play open session disc, close session is suggested for
max. compatibility.
10.2 CD to HDD Edit
To select tracks from single or multi-audio CD and create image to specific partition of HDD
The basic operation method is same as CD to CD Edit, system still ask you to insert empty disc
even the target drive is HDD. If burning successful, system will show ''Image load OK'', which
means the selected tracks are written to temporary partition.
Press ENT after burning, system will ask if you want to continue edit, use ▲ ▼ to confirm Yes or No.
If you want to continue edit, the current source CD will be ejected and ask you to insert next disc.
Repeat the above process for editing. If ''No'' is selected, system will show ''Burn or Move to partition
?'', use ▲ ▼ to confirm Burn or Move.
Burn : Burn the selected tracks to CD
Move to partition : Create an image for selected tracks.