


17
Main Menu
In Setup sub-menu, user can set the following: Screen Setting, System Setting, Parental Control, Closed Caption, Time Zone,
and Factory Default.
Press ZOOM on the remote control to select screen format to Normal/Zoom/Fill or
Press MENU on the remote control to display the Main Menu
1. Using Up/Down arrow buttons to highlight “Screen Format”, OK to enter.
2. Press Left/Right arrow buttons to select Normal/Zoom/Fill format
Setup
Screen Setting
System Setting
In system Setting sub-menu, OSD language, Audio language, Guide default,
and Auto Sleep.
Press MENU on the remote control to display the Main Menu
OSD Language:
1. Using Up/Down arrow buttons to highlight “OSD Language”, OK to enter.
2. Press Left/Right arrow buttons to select English/Spanish/French
Audio Language:
1. Using Up/Down arrow buttons to highlight “Audio Language”, OK to enter.
2. Press Left/Right arrow buttons to select English/Spanish/French
Guide Default:
Press MENU on the remote control to display the Main Menu
1 Using Up/Down arrow buttons to highlight “Guide Default”, OK to enter.
2 Press Left/Right arrow buttons to select Simple/Full Guide
Auto Sleep:
Press MENU on the remote control to display the Main Menu
1. Using Up/Down arrow buttons to highlight “ Auto Sleep”, OK to enter.
2. Press Left/Right arrow buttons to select On/ Off;
15min./30min./1hr./2hr./3hr./4hr.
OSD Language:
Audio Language:
Guide Default:
Auto Sleep:
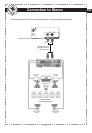
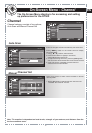
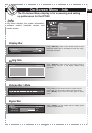
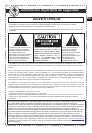
On-Screen Menu - Setup
The On-Screen Menu display is for accessing and setting
up preferences for the DT502
Setup category consists of 7 options;
Screen Setting, System Setting, Parental
Control, Closed Caption, Time Zone, Smart
Antenna, and Factory Default
Setup
Screen Setting
System Setting
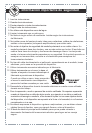
Screen Setting allows you to set the screen format and
aspect ratio option.
Press [ ZOOM ] on the remote control to set screen format to
Normal/Zoom/Fill or press [ MENU ] button on the remote
control to display the On-Screen Menu and follow the steps
below:
1. In the Setup submenu press
[ p / q ] buttons to highlight
“Screen Setting” press [ OK ] to confirm
2. Screen Format (Normal, Zoom, Fill)
3. Aspect Ratio (Auto detect, 4:3 for standard screen, or
16:9 for wide screen)
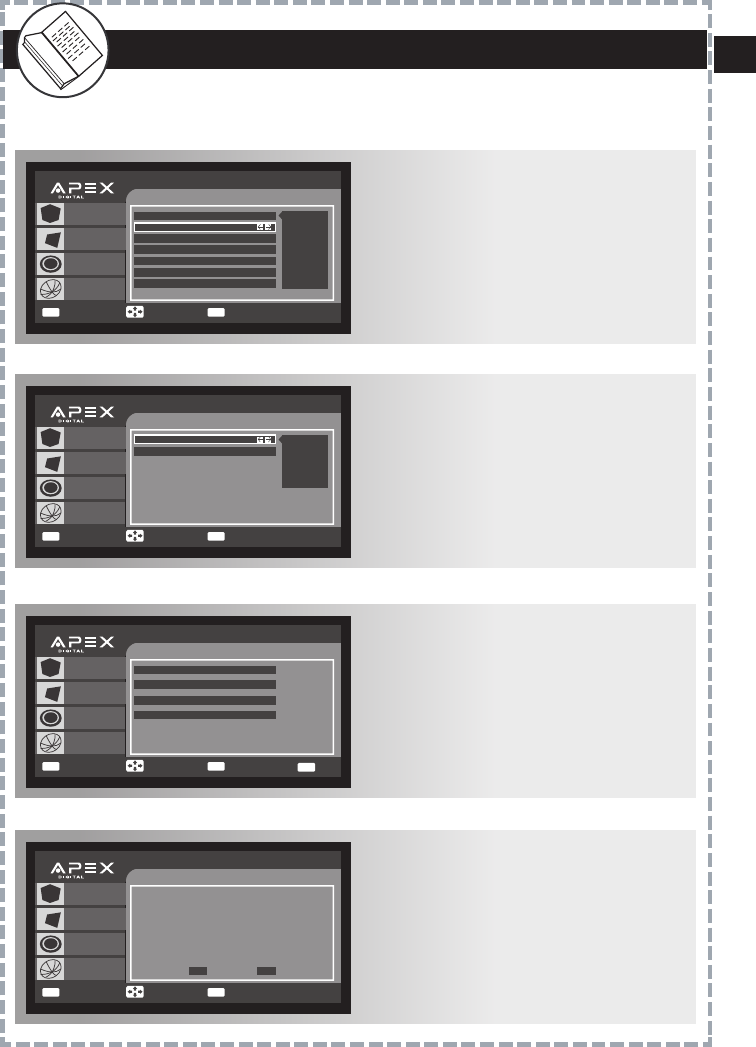
System Setting allows you to set the OSD Language, Audio
Language, Guide Default, and Auto Sleep timer.
Press [ MENU ] button on the remote control to display the
On-Screen Menu and follow the steps below:
1. In the Setup submenu press
[ p / q ] buttons to highlight
“System Setting” press [ OK ] to confirm.
2. OSD Language (English/Spanish/French)
3. Audio Language (English/Spanish/French)
4. Guide Default (Simple/Full Guide)
5. Auto Sleep (ON/OFF/15min/30min/1hr/2hr/3hr/4hr)
OK Enter
MENU
Exit
EXIT
Previous PageMove
Channel
Setup
Setup
Screen Setting
System Setting
Parental Control
Closed Caption
Time Zone
Smart Antenna
Factory Default
Time / Date
Guide
Info
MENU
Exit
EXIT
Previous Page
Channel
Setup
Screen Setting
Time / Date
Guide
Info
Screen Format
Fill
Aspect Ratio
Current Video is 1080i
Aspect ratio is 16:9
Auto
Normal
Zoom
Fill
Select
MENU
Exit
EXIT
Previous Page
Channel
Setup
Screen Setting
Time / Date
Guide
Info
OSD Language
English
Audio Language
English
Guide Default
Simple
Auto Sleep
4hr
English
Spanish
French
Select
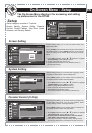
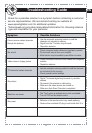
Parental Control (V-Chip)
Parental Control allows you to setup access to programs by
its designated rating level. You can Lock System, select
Country, Rating Control, & Change Password.
Press [ MENU ] button on the remote control to display the
On-Screen Menu and follow the steps below:
1. In the Setup submenu press
[ p / q ] buttons to highlight
“Parental Control” press [ OK ] to confirm.
2. To access the the Parental Control, enter the default
code “0000” when password is requested.
3. You may Lock System, change Country, Rating Control,
and Change Password in the Parental Control sub-menu.
MENU
Exit
EXIT
Previous Page
Channel
Setup
Parental Control
Time / Date
Guide
Info
Lock System
OFF
Country
USA
Rating Control
Change Password
English
Spanish
French
Select
Parental Control (V-Chip) (con’t)
MENU
Exit
EXIT
Previous Page
Channel
Setup
Parental Control
Time / Date
Guide
Info
Lock System
OFF
Country
USA
Rating Control
Change Password
Select
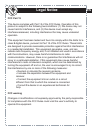
On-Screen Menu - Setup
(con’t)
The On-Screen Menu display is for accessing and setting
up preferences for the DT502
Parental Control (V-Chip) (con’t)
V-Chip reads the ratings for DTV programs, then block the
programs which exceed the rating level you set. With this
feature, you can selectively block programming inappropriate
for children.
Once inside the Parental Control sub menu, select the
country you are located in and the appropriate rating options
will appear.
Change Password - you set a new password by selecting this
option. Default password ”0000”
1. Using
[ p / q ] buttons, select Change Password.
2. Enter your new password and confirm the change by
re-entering the new password.
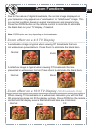
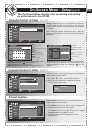
MPAA Rating is the rating system created by MPAA (Motion
Picture Association of America). Use arrow buttons to move
and [ OK ] button to select. Once blocked a “ ” icon will
appear.
TV Rating - Use arrow buttons to move and [ OK ] button to
select. Once blocked, a “ ” icon will appear.
Sub Rating: FV(Fantasy Violence), V(Violence),
S(Sexual Situation), L(Coarse Language), D(Suggestive Dialogue)
TV-Y
TV-Y7
TV-G
TV-PG
TV-14
TV-MA
Appropriate for all children
Appropriate for all children 7 and older
General audience
Parental guidance suggested
Unsuitable for children under 14
Mature audiences only
G
PG
PG-13
R
NC-17
X
NR
Genral audience
Parental guidance suggested
Unsuitable for children under 13
Restriced; under 17 requires adult
No one 17 and under admitted
Mature audiences only
No rating
MENU
Exit
EXIT
Previous Page
Channel
Setup
USA
Time / Date
Guide
Info
TV rating
Movie (MPAA) rating
Select
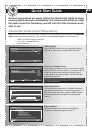
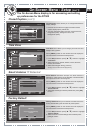
Closed Caption
Closed Caption menu allows you to change/customize the
display settings for closed caption.
Press [ MENU ] button on the remote control to display the
On-Screen Menu and follow the steps below:
1. In the Setup submenu press
[ p / q ] buttons to highlight
“Closed Caption” press [ OK ] to confirm.
2. Press arrow buttons to change Caption Type and
Customization”
MENU
Exit
EXIT
Previous Page
Channel
Setup
Closed Caption
Time / Date
Guide
Info
Caption Type
OFF
Customization
OFF
OFF
Auto/On
Service1
Service2
Service3
Service4
Service5
Service6
CC1
CC2
Select
OK Enter
TV Rating
All FV V S L D
Allow All
Block All
TV-Y
TV-Y7
TV-G
TV-PG
TV-14
TV-MA
Movie (MPAA) Rating
Allow All
Block All
G
PG
PG-13
R
NC-17
X
NR
Block
Password
New : - - - -
Confirm : - - - -
On-Screen Menu - Setup
(con’t)
The On-Screen Menu display is for accessing and setting
up preferences for the DT502
Closed Caption (con’t)
Closed Caption menu allows you to change/customize the
display settings.
1. Press the arrow buttons to higlight and select closed
caption display option preferences
2. You may customize caption font size, foreground color,
foreground opacity, background color, and
background opacity.
MENU
Exit
EXIT
Previous Page
Channel
Setup
Closed Caption
Time / Date
Guide
Info
Caption Type
OFF
Customization
ON
Caption Size
Standard
Foreground Color
White
Foreground Opacity
Full
Background Color
Blue
Background Opacity
Full
ON
OFF
Select
Time Zone
Time Zone menu allows you to change your time zone and
daylight saving options.
Press [ MENU ] button on the remote control to display the
On-Screen Menu and follow the steps below:
1. In the Setup submenu press
[ p / q ] buttons to highlight
“Time Zone”
2. Select a time zone, Hawaii, Alaska, Pacific, Mountain,
Central, and Eastern.
3. Select Auto Daylight Saving (Yes/ No)
*See page 12 for more details on Auto Daylight Saving
MENU
Exit
EXIT
Previous Page
Channel
Setup
Time Zone
Time / Date
Guide
Info
Time Zone
Pacific
Auto Daylight Saving
Ye s
Hawaii
Alaska
Pacific
Mountain
Central
Eastern
Select
Smart Antenna *If Detected
Smart Antenna sub-menu will open if a smart antenna is
detected. If smart antenna is not detected, it will be indicated
and options sub-menu will not appear.
Press [ MENU ] button on the remote control to display the
On-Screen Menu and follow the steps below:
1. In the Setup submenu press
[ p / q ] buttons to highlight
“Smart Antenna”
2. Select/adjust settings to desired preferences press [ OK ]
to save.
MENU
Exit
EXIT
Previous Page
Channel
Setup
Smart Antenna
Time / Date
Guide
Info
Select
Factory Default
Factory Default allows you to reset the converter box to the
factory default setting and will erase all preset options.
Press [ MENU ] button on the remote control to display the
On-Screen Menu and follow the steps below:
1. In the Setup submenu press
[ p / q ] buttons to highlight
“Factory Default”
2. Select “Yes /No” to reset settings back to default press
[ OK ] to confirm..
MENU
Exit
EXIT
Previous Page
Channel
Setup
Setup
Warning
Are you sure to load Factory
Default?
Time / Date
Guide
Info
Ye s No
Select
OK Save
Mode Auto
Auto
Manual
Direction 0
Gain 0
Polarity 0
EN