


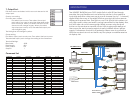

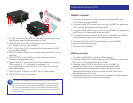

HARDWARE INSTALLATION
HSW88C as Master
1. Connect all sources to HDMI Inputs on the 8x8 HDMI over
CAT5 matrix master HSW88C
2. Connect each DDC output port on the HSW88C to respective
DDC port on the remote receiver HSMR
3. Connect each TMDS output port on the HSW88C to respective
TMDS input on the remote receiver HSMR
4. Connect IR blaster to the IR MAIN jack of HSW88C and direct
the IR blaster to the built-in IR receiver of the sources
5. Connect the +5V 6A DC power supply to the HSW88C
6. Power on all HDMI sources
7. Power on the HSW88C
HSMR as receiver
1. Connect each HDMI output to HDMI displays
2. Connect each DDC output port on the HSW88C to respective
DDC port on the remote receiver HSMR
3. Connect each TMDS output port on the HSW88C to
respective TMDS input on the remote receiver HSMR
4. Connect IR receiver and place the IR receiver at the
appropriate position that can receive the IR command
signals sent from the users
5. Dial the 8-level rotary control switch to adjust the HDMI signal
level until the picture and sound are clear
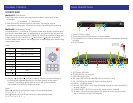
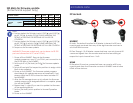
1 2 3 4
5
6
7
8
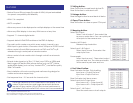
1.+5V DC: Spare power jack for over 60m transmission when
the RX may need external power to work*.
2. TMDS: Plug in the CAT5 connected to the respective
A/V SIGNAL port on the HSW88C
3. DDC: Plug in the CAT5 connected to the respective DDC
port on the HSW88C
4. INPUT CHANNEL: Display the current selected HDMI source
channel
5. INPUT SELECT: Push button for switching input source
channel in sequential order
6. Signal Level 0-7: Adjust the 8-level equalization control for
HDMI signals. 0 – 7 = strongest to weakest. It is
recommended to switch from 7 to 0 to find the optimal
visual experience.
7. HDMI Output: Connect to HDTV with a HDMI cable
8. IR RECEIVER: Plug in IR receiver
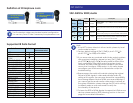
The HSMR has been tested extensively and found that
it doesn’t require external power supply. If in rare situation
you find it cannot work with the HSW88C, please use any
+5V power adapter to plug in the power jack and see if it
can work. If not, please contact your technical support for
further service.