


Scorpion™ GBC 2.0/RGY User Manual (Rev. 2 ML) Page 15 of 52
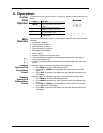
Automatic Mode
To enable the Automatic mode, follow the instructions below:
1. Press <MENU> repeatedly until the active option of the Auto/Sound branch
(AF1 to rdM) shows blinking on the display.
2. Use <UP> or <DOWN> to select an automatic program (AF1~ASM).
3. Press <ENT> (the new auto program will show solid on the display).
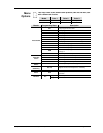
Laser Sky Color
Mode
To enable the Laser Sky Color mode, follow the instructions below:
1. Press <MENU> repeatedly until the active option of the Laser Sky Color
branch (LS1 to LSS) shows blinking on the display.
2. Use <UP> or <DOWN> to select a laser sky color option (LS1~LSS).
3. Press <ENT> (the new laser sky color will show solid on the display).
Laser Sky Effect
Mode
To enable the Laser Sky Effect mode, follow the instructions below:
1. Press <MENU> repeatedly until LSU shows blinking on the display.
2. Use <UP> or <DOWN> to change the angle of the laser sky effect.
3. Press <ENT> (LSU will show solid on the display).
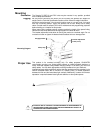
Reverse Motion
To reverse the direction of the pan and tilt motion, follow the instructions below:
1. Press <MENU> repeatedly until rEv shows blinking on the display.
2. Press <ENT> (the current option for pan direction will show (P-n or P-Y).
a) To change the setting, use <UP> or <DOWN> and continue to step “3”.
b) To keep the setting, continue to step “3”.
3. Press <ENT> (the current option for tilt direction will show (t-n or t-Y).
a) To change the setting, use <UP> or <DOWN> and continue to step “4”.
b) To keep the setting, continue to step “4”.
4. Press <ENT> (the current software version will show briefly on the display,
followed by rEv).
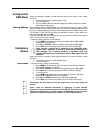
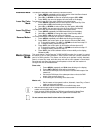
Master/Slave
Mode
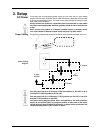
This mode allows a single Scorpion™ GBC 2.0/RGY product (the “master”) to control
the actions of one or more Scorpion™ GBC 2.0/RGY units (the “slaves”) without the
need of a DMX controller. The master unit will be set to operate in either Automatic,
Sound, or Laser Sky mode, while the slave units will be set to operate in Slave Mode.
Once set and connected, the slave units will operate in unison with the master unit.
Configure the units as indicated below.
Slave units:
1. Press <MENU> repeatedly until SLA shows blinking on the display.
2. Press <ENT> (SLA will show solid on the display).
3. Connect the DMX input of the first slave unit to the DMX output of the
master unit
4. Connect the DMX input of the subsequent slave units to the DMX
output of the previous slave unit.
5. Finish setting and connecting all the slave units.
Master unit:
1. Set the master unit to operate in either, Automatic, Laser Sky, or Sound
mode, as previously indicated.
2. Make the master unit the first unit in the DMX daisy chain.
• Wait until all the slave units are configured and connected before connecting the
master unit to the DMX daisy chain.
• Never connect a DMX controller to a DMX string configured for Master/Slave
operation because it may interfere with the signals from the master unit.
Do not connect more than 31 slave units to the master unit.