


4 CMRCI- BSS/SB
CMRCI- BSS/SB
9
Take the following precautions before wiring your system.
•
Disconnect the negative battery terminal before making any
wiring connections.
•
Be particularly careful where you route wires and cables.
Keep them away from the engine, exhaust system, etc.
Heat may damage wires. Sharp edges can pierce wire
insulation and cable jackets, causing short circuits, damage
to the craft, blown fuses, and system failure.
•
If any fuse should blow, make sure all connections are cor-
rect and no wires are damaged before replacing the fuse.
Always use fuses that are the same amperage value as the
Always use fuses that are the same amperage value as the
Wiring Connections
Wiring Connections
Wiring
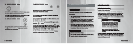
1. Connecting the ground lead.
Connect a wire to one of
the mounting studs on the
rear of the unit, using a #8
ring terminal (not supplied).
Connect this wire to the
boatʼs negative (-) ground.
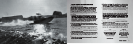
The CMRCI-BSS/SB is a waterproof remote control paneL
which allows operation of the Clarion CMD4 or M455 head
unit from a remote location
.
The
CMD4 or M455
unit is an
AM/ FM CD player with controls for an optional CD changer
and an optional Sirius Satellite Radio receiver.
A maximum of two
remotes
units may be used with a
single
CMD4 or M455
(using an optional
M
101
RYC
adapter)
The
CMRCI-BSS/SB
can be connected to your boatʼs
illumination circuit, backlighting the panel in low-light condtions.
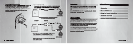
What is included
What is included
•
Remote control panel (1)
•
One mounting bracket and four 7mm hex nuts (1 set)
•
Ownerʼs Manual / Installation Guide (1)
Note:
An 24ʼ extension DIN cable is available separately (P/N
M101RXC).
Clean the remote control panel with a slightly damp,
soft cloth using household glass cleaner. Do not use
solvents such as benzene, thinner, or commercially
availa ble cleaners.
From time to time, inspect the connections on the rear
of the unit for corrosion and correct as needed.
1. INTRODUTION
2. CLEAN AND MANTAINANCE
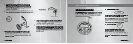
panel through the two holes in the mounting bracket
(as shown below).Tighten the 7mm hex nuts into bracket
again insuring that the gasket seals seals tightly to the front
of mounting surface. Avoid pinching the cabel.
�. Position the bracket onto the rear of the remote control
panel, sliding the two threaded studs on the rear of the