CONNECTIONS
1716
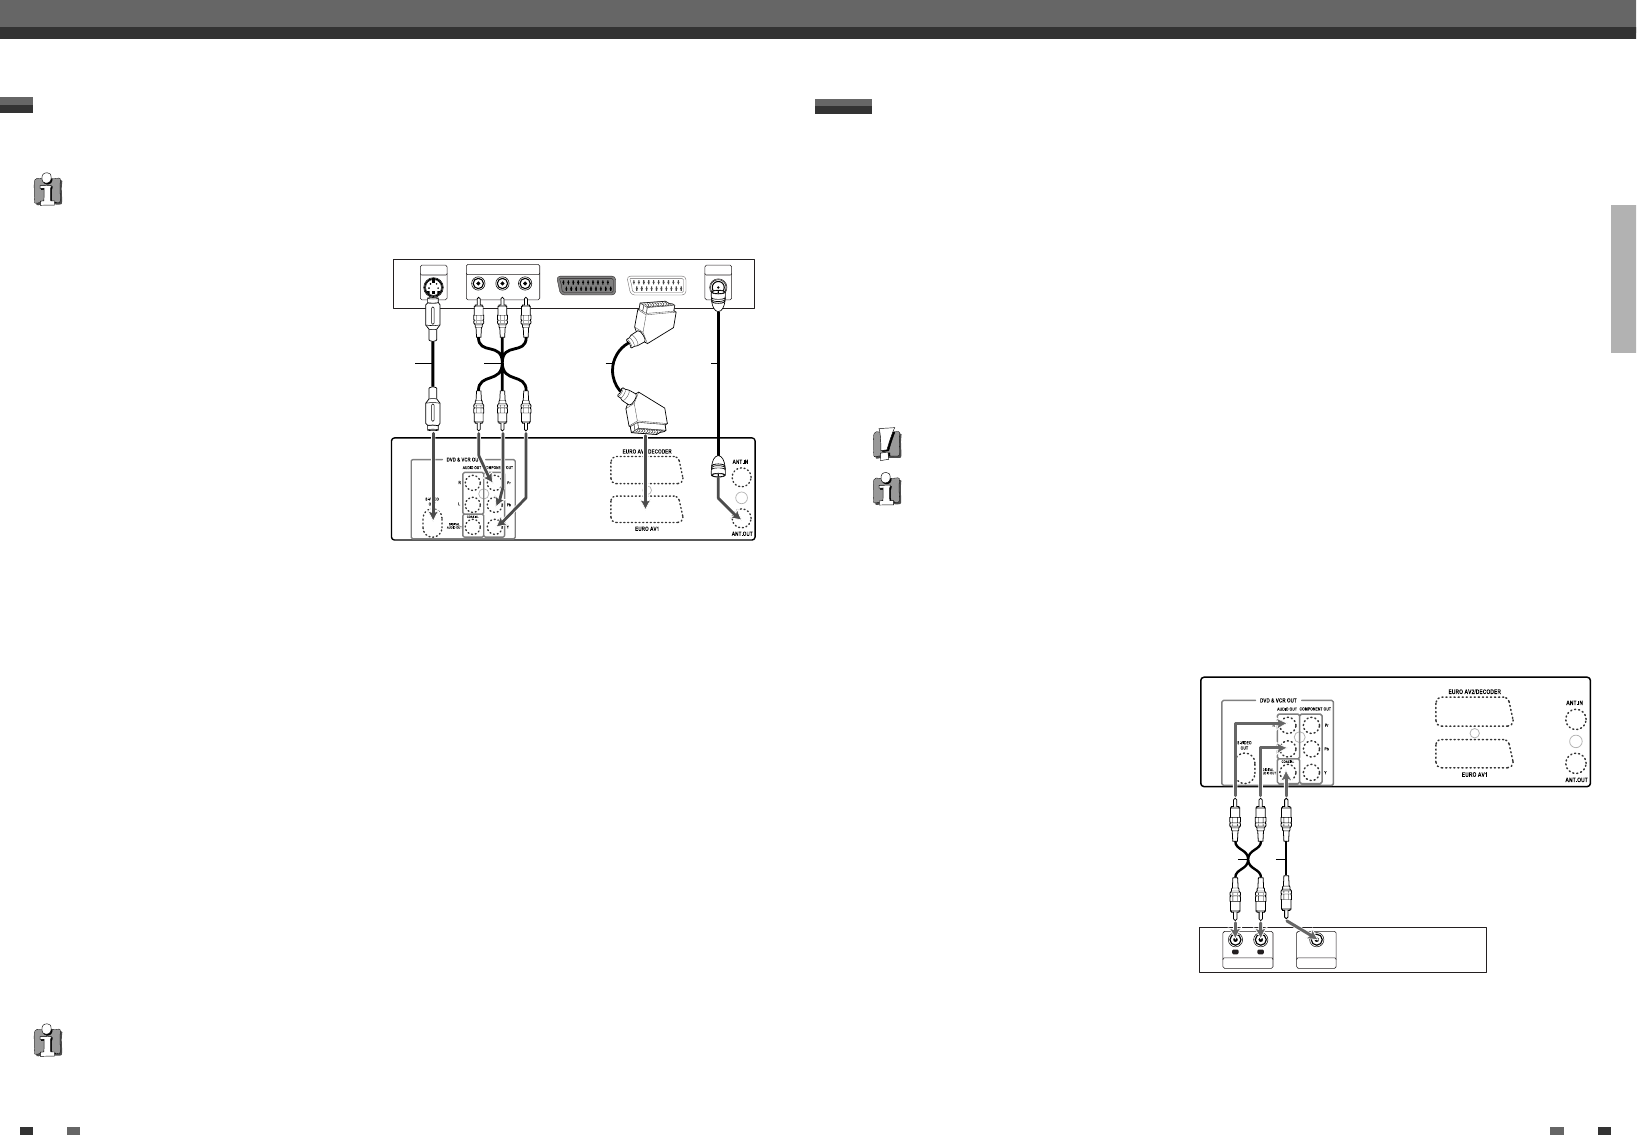
Choose one of the following TV connections, depending on the capabilities of your equipment.
RF Connection
Connect the RF OUT (TO TV) jack on the DVD
Recorder+VCR to the antenna in jack on your TV using
the supplied 75-ohm RF cable (R).
Scart Connection
1
Plug a scart cable into the scart socket EURO
AV1 at the back of the DVD Recorder+VCR and
the corresponding scart socket at the back of the
TV set. (V)
2
Plug a scart cable into the blue scart socket
EURO AV2/DECODER at the back of the DVD
Recorder+VCR and the corresponding scart
socket at the back of the Decoder.
S-Video Connection
1
Connect the S-VIDEO OUT jack on the DVD Recorder+VCR to the S-Video in jack on your TV using an S-
Video cable (S).
2
Connect the Left and Right AUDIO OUT jacks from the DVD Recorder+VCR to the left/right audio in jacks on
your TV using the audio cables.
Component Video Connection
1
Connect the COMPONENT/PROGRESSIVE VIDEO OUT jacks on the DVD Recorder+VCR to the corresponding
in jacks on your TV using a Y Pb Pr cable (C) if the component (Y, Pb, Pr) is available on your TV.
2
Connect the Left and Right AUDIO OUT jacks from the DVD Recorder+VCR to the left/right audio in jacks on
your TV using the audio cables.
Connecting a TV
Connections
All video signals are available from all video outputs.
That means that whichever TV connection you use, it will
work with all input sources, including VHS out of the Component/Progressive Video Output.
ANTENNA
INPUT
Y
Pb
Pr
COMPONENT/PROGRESSIVE VIDEO INPUT
S-VIDEO
INPUT
RV
S C
Progressive Scan Connection
• If your television is a high-definition or ‘digital ready‘ television, you may take advantage of the DVD
Recorder+VCR’s Progressive Scan output for the highest video resolution possible.
• If your TV does not accept the Progressive Scan format, the picture will appear scrambled.
1
Connect the COMPONENT/PROGRESSIVE VIDEO OUT jacks on the DVD Recorder+VCR to the corresponding
in jacks on your TV using an optional Y Pb Pr cable (C).
2
Connect the Left and Right AUDIO OUT jacks from the DVD Recorder+VCR to the left/right audio in jacks on
your TV using the audio cables.
• Be sure to set the DVD Recorder+VCR to Progressive Scan mode by pressing and holding [P.SCAN] for 3 seconds
(or changing the ‘Video Output’ in the Setup Menu; see page 27).
• Progressive Scan does not work with the RF, Audio/Video or S-Video connections.
Connecting to an amplifier equipped with two channel analog stereo or Dolby Pro Logic ll/Pro Logic
Connect the Left and Right AUDIO OUT jacks on the DVD Recorder+VCR to the left and right audio in jacks on
your amplifier, receiver, or stereo system, using the supplied audio cables (A).
Connecting to an amplifier equipped with two channel digital stereo (PCM) or to an Audio/Video receiver equipped
with a multi-channel decoder (Dolby Digital™, MPEG 2, or DTS)
1
Connect the DVD Recorder+VCR’s DIGITAL AUDIO OUT jack (Coaxial) to the corresponding in jack on your
amplifier. Use an optional digital coaxial audio cable. (X)
2
You will need to activate the DVD Recorder+VCR’s digital output; see ‘Audio’ Settings on page 28.
Digital Multi-Channel Sound?
A digital multi-channel connection provides the best sound quality. For this you need a multi-channel
audio/video receiver that supports one or more of the audio formats supported by your DVD Recorder+VCR
(MPEG 2, Dolby Digital, and DTS). Check the receiver manual and the logos on the front of the receiver.
Connecting an Amplifier/Receiver
• Due to the DTS Licensing agreement, the digital output will be in DTS digital out when DTS audio stream is
selected.
• If the audio format of the digital output does not match the capabilities of your receiver, the receiver will produce
a strong, distorted sound or no sound at all.
• 5.1 channel digital surround sound via the digital connection can only be obtained if your receiver is equipped with
a digital multi-channel decoder.
• To see the audio format of the current DVD on the on-screen display, press [AUDIO].
The DVD Recorder+VCR does not perform internal (2- channel) decoding of DTS sound tracks. To enjoy DTS multi-
channel surround, you must connect the DVD Recorder+VCR to a DTS compatible receiver via one of the DVD
Recorder+VCR’s digital audio outputs.
R
L
AUDIO INPUT DIGITAL INPUT
COAXIAL
A X
Connections
Rear of DVD Recorder+VCR
Rear of TV
Rear of DVD Recorder+VCR
Amplifier (Receiver)


