


2 Dell PowerConnect W-Series ArubaOS 6.2 | Quick Start Guide
2. Make sure that the controller is not connected to any device on your network.
3. Boot up the controller.
4. Connect your PC or workstation to a line port on the controller.
5. On your PC or workstation, open a Web browser and connect to https://172.16.0.254.
6. The controller contains a default server certificate to validate the device on the network. At the Security Alert,
click Yes to proceed with the Setup Wizard.
7. The initial window of the Mobility Controller Setup Wizard asks you to select one of the following
deployment modes. Select Standalone, Master, Local or Remote Node, then click Continue. If you are
configuring a Remote Node controller, refer to the Dell PowerConnect W-Series ArubaOS 6.2 User Guide for
details on using the Remote Node Configuration Wizard.
Standalone: This is the only controller on the network.
Master: This controller will manage other controllers on the network.
Local: This controller will be managed by a master controller.
Remote Node: This controller will act as a remote node and get its local and global configuration and
license limits from a master controller called a remote node controller (RNC).
8. If you selected Standalone or Master in the step above, you will be prompted to select the Campus WLAN or
Remote Access Points deployment mode. The Remote Access Points deployment mode allows you to
configure additional settings specific to remote APs.
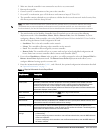
9. Enter the information described in Table 1, and, if desired, the optional configuration information described
in “Optional Information” on page3.
NOTE: The default certificate installed in the controller does not guarantee security in production networks. Dell strongly
recommends that you replace the default certificate with a custom certificate issued for your site or domain by a trusted
Certificate Authority. See the
Dell PowerConnect W-Series ArubaOS 6.2 User Guide
for more information about certificates.
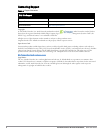
Table 1
Required Information for the Setup Wizard
Requirement Description
System Name A user-defined name by which the controller will be referenced. You can specify a name of up to 63
characters.
Country Code The country in which the controller will operate. The country code determines the 802.11 wireless
transmission spectrum. You cannot change the country code for controllers designated for certain
countries, such as the U.S. or Israel. Improper country code assignment can disrupt wireless
transmissions. Most countries impose penalties and sanctions for operators of wireless networks with
devices set to improper country codes.
Admin Password Password of up to 32 characters for the admin user to log in to the controller.
Enable Mode
Password
Password of up to 15 characters for the admin user to access the Enable mode in the CLI.
Date and Time You can either manually set the date, time, and GMT time zone or specify the IP address of an NTP server
from which the controller will obtain its date and time settings.
Connectivity Settings Enter the controller IP address and default gateway.The gateway is usually the IP address of the
interface on the upstream switch or router to which you will connect the controller. The default gateway
and the VLAN 1 IP address need to be in the same network.
Authentication
Settings
If you are configuring a master or local controller that uses pre-shared key authentication, enter the
pre-shared key.
If you are configuring a master controller to use certificate authentication, enter the MAC addresses
of the local controllers.
If you are configuring a local controller to use certificate authentication, enter the MAC address of
the master controller.