


User Manual for Commercial Series Net DVR
Page 71 Total 121
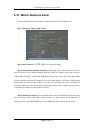
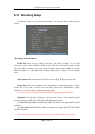
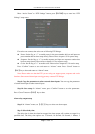
6.12 Recording Setup
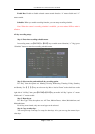
In main menu, there is an icon named “Recording”. You can enter into recording menu as
follows:
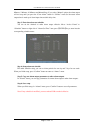
“Recording” menu description:
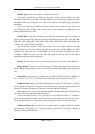
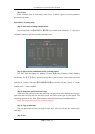
If HD Full: There are two options: “Overwrite” and “Stop recording”. If you select
“Overwrite” option, when all HDDs in DVR are full, DVR will overwrite the earliest recorded
files and continue recording. If you select “Stop recording” option, when all HDDs are all full,
DVR will handle it as “Hard Disk Full” exception, please refer to chapter 5.17 for exception
menu.
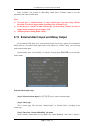
Select Camera: Here all channels are listed. You can use【↑】【↓】keys to select one.
Stream Type: There are two options, one is “Audio&Video” stream and the other is “Video”
stream only. If you want to record video and audio, please select “Audio&Video” option,
otherwise you can select “Video” option to record only video.
Note: If you change this option, please reboot DVR to make parameter into effective.
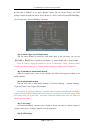
Resolution: The higher the resolution is, the clearer the image is. The resolution options
from low to high are: QCIF, CIF, 2CIF, DCIF, 4CIF depending on model.
For QSD42208, QSC26408, and QSC26416 DVRs: All channels can support QCIF and CIF
resolution.
For QSF2648008 and QSF2648016 DVRs: All channels can support QCIF, CIF, 2CIF, DCIF
and 4CIF resolution.
Note: If you change this resolution option, please reboot DVR to make it into effective.