


Page 8
Page 7
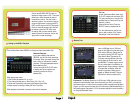
Searched Playback:
If you input a specific date and click
SEARCH, you will find all the recordings
for that day. When you select the day and
time to view, you will see all 4 cameras
play back. (The highlighted dates are the
files available to play.)
You can also click the FILE LIST button
to display the File list interface, and
playback or backup the file you
selected (D2).
File List:
On the Video Search Menu mode, click
FILE LIST to display the sub-menu (D2).
This option allows you to view all of the
available files by Channel and Type (All,
General, or Alarm).
Select a file from the list. Push the
SELECT button to playback the file.
For more information on the File List
option, refer to section 5.2.4 “Search
Recordings” in the User’s Manual.
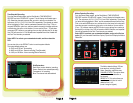
Click on the MD AREA SETUP button, to
display the image shown in (C6). This option
allows you to select the area you want to
be sensitive to motion. The area in red is
sensitive to motion. You can set this area by
using the USB mouse, or pushing the REV,
FWD, and SEL keys on the DVR front panel.
Once you have set the area, right click with
the mouse or push the ESC key to save
the setting. After you have set the motion
sensitivity area for all cameras, click on the
Apply button to save the settings.
D Setting up the DVR to Playback
When playing back video:
1. Fast Forward at speeds of 2x, 4x, or 8x
2. Play video at Normal pace, or Slow Play at 1/2x, 1/4x, 1/8x
3. Pause and Play frame by frame using the Playback Control Bar
4. Adjust volume by clicking or sliding the Tune Control Bar.
When playback has finished, the previous menu will be displayed.
E Backup Files
Insert a USB flash drive or USB hard
drive into the USB port on the back of the
DVR, bottom USB port. Display the File
List menu by clicking FILE LIST from the
Video Search Menu. (See section D).
To backup one recorded event from the
file list, select the file from the list, and
click BACKUP. To backup more than one
file, put a check mark in the BAK box at
the end of each file you choose to backup.
A Progress Bar will display. When the
backup is complete, a dialog box will
appear as “Backup Success!” Click the
[OK] button to save your backup (E2).
Explanation: The Backup file will be in H.264 format. H.264 video can only be
viewed with the Multimedia Player which comes with your DVR, or through the
NetViewer program. In order to have your backup video compatible with all Media
Players, you must convert the video into AVI format using the Multimedia Player or
NetViewer program. See section 5.2.5 in the product manual for more information
on using the Multimedia Player.
From the Main Menu select SEARCH to display the Video Search Menu (D1).
C6
D1
D2
E2
E1