


25
26
4 - Press the Exit button again to complete the priority assignment.
5 - Repeat Steps 1 through 4 to select the next video input and adjust the priority setting.
Audio Input
The Audio Input function assigns an audio input to the currently selected video input. Four digital
audio inputs and a single analog audio input are available. The HDMI inputs can accept both audio
and video. To assign the audio input to another video input, push the p/q buttons. The front panel
display (FPD) shows the current setting. For more info about how to assign an audio input to a video
input, refer to Audio Input Operation.
AV Lip Sync™
The iScan VP50
PRO
automatically delays the input audio to match the video processing delay.
You can choose to increase or decrease the audio delay by changing this setting. Push the p or
q button to display the current additional bias delay setting (default 0). Up to 200 milliseconds
of delay can always be added to the audio signal after the iScan has compensated for the video
delay. Use the p or q button to increase or decrease the delay in milliseconds.
NOTE: The total audio delay cannot be less than 0, that is, the iScan cannot have negative audio
delay. If you choose to decrease the automatic delay setting by a certain amount, this value could
be changed by the iScan in situations where the iScan’s calculated delay plus the specied additional
delay results in a value less than 0.
Picture Controls
For each input there are different picture memories for each accepted input resolution. These memo-
ries are accessed automatically when an input resolution is detected.
Fine Detail Enhancement
This control enhances the ne detail in images. Fine detail can be sharpened by adjusting the control
into the positive range, up to 50, and it can be softened by adjusting this control into the negative
range, down to -50. The default setting on this control is midrange, 0.
Edge Enhancement
This control enhances the sharpness of images on the edges. Edges can be sharpened by adjusting
the control into the positive range, up to 50, and they can be softened by adjusting this control into
the negative range, down to -50. The default setting on this control is midrange, 0.
Brightness
This control adjusts the brightness (black level) of the overall image output from the iScan VP50
PRO
.
If you turn it up too high, it may make black look gray. In general, you should adjust this up until
you see the black areas of your display turn gray and then back it down just below that point. The
default setting is midrange, 0.
Contrast
Contrast adjusts the ratio between white and black signal levels and is effective as a gain control.
The difference between this and the Brightness control is that this adjusts the difference between the
brightest and darkest part of the image. Note that all displays have a maximum white level. Going
beyond this level only “clips” the upper gray levels and you will lose color resolution at the brighter
levels. Adjust this control up until you see the brighter levels of the image begin to wash out, at this
point, back it down just below that point. The default setting is midrange, 0.
Saturation
The iScan VP50
PRO
allows you to control the saturation of the image independent of the display.
Saturation is the same as the “Color” control on most TVs and controls the richness of the color in
the image. The default setting is midrange, 0.
Hue
As with Saturation, hue can also be controlled independent of the display. Hue is the same as the
“Tint” control found on most TVs and controls how colors are displayed in the image. The Hue control
is not available for Component or PAL/SECAM inputs. The default setting is midrange, 0.
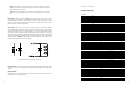
Y/C Delay
Sometimes there is a lag between the Luminance (Y) and the Chrominance (Pb/Pr or Cb/Cr) of the
video signal. This causes a color “smearing” because the color component of the image is not lin-
ing up properly to the black and white luminance component of the image. The iScan VP50
PRO
can
compensate for these errors in the source signal by shifting the phase of the Y with respect to the
C, forward or backward to align them properly. Use the p and q buttons to adjust the phase and
observe the effects on your display to obtain the optimal setting. The default setting is 0.
Chroma Filter (Auto CUE-C™)
This feature removes chroma upsampling errors (CUE) found in video sources which have been MPEG
encoded and then improperly decoded.
• Off - No chroma ltering. Use this setting if the source does not have a CUE problem.
• On - Chroma ltering is always on. Use this setting if the source is known to have a CUE problem.
• Auto - Automatic chroma error detection and correction. Use this setting when you don’t
know if a source has a CUE problem. Also use this setting for all digital sources which use
MPEG2 decoders (DVD players, digital satellite receivers, and so on.) as it will also detect and
correct chroma errors created by all sources of this type when the source is encoded as inter-
laced (also sometimes called Interlaced Chroma Problem, or ICP). This is the default setting.
Presets
The iScan VP50
PRO
has 5 memories that can be used to set the Picture Controls differently on the
same input. 3 of these presets are “ISF” modes that can only be saved by an ISF Certied Calibrator
(www.imagingscience.com). These 3 modes can be dened by a calibrator for the optimum viewing
experience during the day and night, where the ambient light is typically different. There are also
2 modes which can be used by a User to dene their own optimum viewing during these same
conditions. To adjust these parameters, simply highlight the Preset that you would like to change
and then make changes.
Conguration
Test Patterns
The iScan VP50
PRO
has 27 internal test patterns to assist in the setup of your individual sources and
your display. To learn more about how to use the internal test patterns, refer to Section - 3: Setup.
To turn the test patterns on and off, use the Test Pattern On/Off button. To navigate backwards and
forwards through the available test patterns use the t and u buttons, respectively.
Auto Standby
The default setting is ‘Off’, which means iScan VP50
PRO
is always in Active mode, regardless of the
activity state of the selected input. If Auto Standby is ‘On’, the iScan VP50
PRO
goes into Standby mode
30 seconds after the selected input becomes inactive. To see the current setting, press p or q.
Then press the same button again to change the setting.