


6
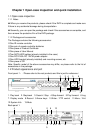
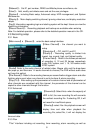
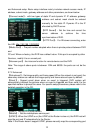
1.16CH video in 2.Main video out 3. Auxiliary video out 4.16CH Audio in
5.Intercom in and audio out 6.Network port 7.USB port 8.RS485 9.Power in
10.4CH alarm out & 16CH alarm in 11.HD output port 12.VGA output 13.Power
switch
1.3 Quick installation
1.3.1 HDD installation
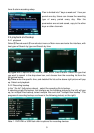
(1)Open the cover of DVR, fix the HDD into the bracket;.
(2) Connect the HDD data and power cable to the HDD;
(3)Tighten the screws to fix the HDD in the case;
(4)Lock the HDD case.
Note: Do not plug HDD when the DVR is on the power state.
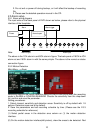
1.3.2 Connection to the camera and monitor
Connect the signal of camera with a BNC cable to the DVR video input, connect the
signal of DVR video output with a BNC cable to the monitor (Please refer to the back
panel figure). Connect the RS485A (+) and the B (-) respectively to corresponding
DVR interface with wires, if camera is the PTZ which can be controlled.
Chapter 2 Software interface basic operation
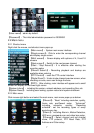
2.1 Power on and login
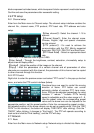
When the DVR is power on, the system enters the preview status. If there is video input,
the corresponding channel will display monitoring video on the main interfacce. If there
is no video input, blue by default. Full screen and multi-screen switch can be realized
through double-click and right click on the main interface. Right click and enter the
shortcut menu, and select Main menu to enter corresponding Main menu interface.
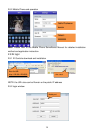
When operating on relevant menus, the system will remind the user to login, interface
as below (picture on the right):