


8
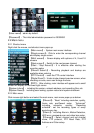
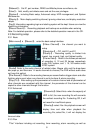
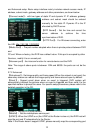
【Network】:Set IP, port number, DDNS and Mobile phone surveillance, etc.
【User】:Add, modify and delete users and set the user privileges.
【System】:including Basic setup, Advanced setup, HDD management, and System
Maintenance.
【Display】:Main display switching interval, ignoring video loss, and display resolution
setups.
【Log】:Information regarding login and starting system will be kept. Users can view the
system log information.
【Record Search】:Recording playback and backup are available when entering
Note: For detailed operation, please refer to the detailed operation manual in the CD.
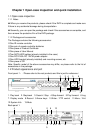
2.3 Recording setup
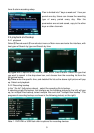
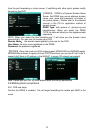
2.3.1 Basic
【Main menu】à【Record】,enter the basic setup Interface:
【Video Channel】:the channel you want to
setup
【Resolution】:CIF, Half-D1 and D1;
【Quality】:Recording quality is divided into
lowest, low, normal, high, and highest quality.
【Frame Rate】:Refer to the frames per second
of encoding. 6, 12 and 25 frames respectively
under PAL system, and 1, 15, 30 frames under
NTSC system.
【Audio】Refer to the audio channel of related video. Mouse click and the drop-down
box pops up, and there are 1-4 audio channels to choose.(The DVR without audio does
not have this option)
【Pre-Record】:Refer to the encoding frames per second before trigger alarm and after
finishing alarm event when one channel is set to be timer & alarm recording.
【Copy To】:After setting up the parameters of a certain channel and all parameters of
other channels are consistent with this channel, the parameter of this channel can be
copied to other channels through this function.
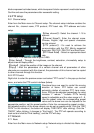
2.3.2 Advanced
【Overwrite】:Select Auto. when the capacity of
HDD is full, the new recording file will overwrite
the earliest recording file. If selecting Off, it will
not record for insufficient space.
【Overlay】:select Yes,the playback screen will
display time and date when playback the
recording file; select No, it will not display the
time and date.
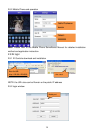
2.3.3 Plan
“Plan” interface including not recording, timer recording, alarm recording as well as