


RCP 1000 • Reference Information
RCP 1000 • Reference Information
Reference Information, cont’d
A-3
Reference Information
A-2
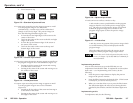
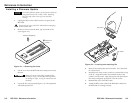
Installing a Firmware Update
To install a firmware update, you may need to replace IC
(integrated circuit) U11 or U16, or both. Replacing
these ICs may result in loss of presets and other
settings.
1. Unplug the RCP comm cable from the rear panel of the
RCP 1000.
Do not open the cover of the RCP 1000 without unplugging
the RCP comm cable.
2. Remove 8 screws from the back, top, and front of the
cover (figure A-1).
Figure A-1 — Removing the cover
3. Lift the cover from the RCP 1000 unit, and place it next to
the unit.
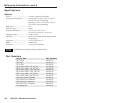
Make sure you are electrically grounded before
touching IC chips. Electrostatic discharge (ESD)
can damage IC chips, even if you cannot sense the
discharge.
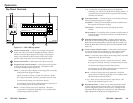
4. Locate the ICs to be replaced (figure A-2). The update kit
will list the specific ICs.
Figure A-2 — Locating and replacing ICs
5. Remove the existing chip and set it aside. Use a standard
IC removal tool.
6. Install the new chip: Locate a notch or a printed dot on top
of the IC. Align the notch or dot with the notch on the
socket or circuit board. Align the IC pins with the holes in
the socket, and gently press the IC into the socket.
7. Reinstall the cover of the RCP 1000.
8. Attach the RCP comm cable to the RCP 1000. Make sure
the RCP 1000 is working correctly.
Remove 8
screws
Lift Cover straight up.
RCP 1000
REMOTE CONTROL PANEL
PROGRAM
FREEZE
BLACK 1
2
3
4
56
7
8
PPREVIEW
FREEZE
BLACK 1
2
3
4
5
67
8
VERT
HORZ
CONT
BRIGHT
CENTER
SIZE
FILTER
COND/BRIGHT
TRANSITIONS
EFFECTS
COMMUNICATION
Tx
Rx
Align Notches
Align Notches
U6
U11