


RCP 1000 • Operation
RCP 1000 • Operation
Operation, cont’d
3-4
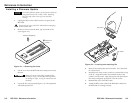
Using the Picture Controls
The picture controls allow you to adjust the centering (center),
sizing (size), filters (filter), and contrast/brightness (cont/bright)
of the preview image.
Centering an image
To adjust the image centering, do the following:
1. Press and release the Picture control button until the
Center LED lights.
2. To adjust the vertical centering, rotate the left adjustment
knob.
3. To adjust the horizontal centering, rotate the right
adjustment knob.
Sizing an image
To adjust the image size, do the following:
1. Press and release the Picture control button until the Size
LED lights.
2. To adjust the vertical size (height), rotate the left
adjustment knob.
3. To adjust the horizontal size (width), rotate the right
adjustment knob.
Filtering an image
To apply a horizontal or vertical filter to an image, do the
following:
1. Press and release the Picture control button until the Filter
LED lights.
2. To change the vertical filter, rotate the left adjustment
knob. Eight levels of vertical filter are available. Choose
the filter that provides the most improvement to the
image detail.
3. To change the horizontal filter, rotate the right adjustment
knob. Eight levels of horizontal filter are available.
Choose the filter that provides the sharpest image.
Adjusting contrast and brightness
To adjust the contrast and brightness of an image, do the
following:
1. Press and release the Picture control button until the
Cont/Bright LED lights.
2. To change the contrast, rotate the left adjustment knob.
3. To change the brightness, rotate the right adjustment
knob.
Applying a Switch
You can switch the program and preview inputs using a variety
of techniques. For a description of each technique, see the
instructions for the technique.
Applying a cut
A cut seamlessly replaces the program image with the preview
image. No effect is applied to the switch. As soon as the Cut
button is pressed, the switch occurs.
To switch using a cut, do the following:
1. Press the preview input button that corresponds to the
input that you want to switch to.
2. Press the Cut button. The seamless switch takes effect
immediately, and the preview image becomes the new
program image.
Applying other effects
If you are using the RCP 1000 with an ECP 1000, all
transition buttons except the Cut button are disabled.
All effect switching must be done through the
ECP 1000.
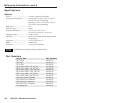
Available effects
The SGS 408 provides a wide variety of effects:
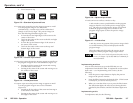
• A dissolve causes the program image to fade out while the
preview image fades in (figure 3-2).
Figure 3-2 — A dissolve effect
• A standard wipe causes the preview image to appear to unroll
over the program image horizontally or vertically. A
standard wipe can have either hard (sharp) or soft (fuzzy)
edges. The preview image can have the following
transitions (figure 3-3 on the next page):
• From left to right
• From right to left
• From top to bottom
Dissolve
Dissolve
3-5