


3
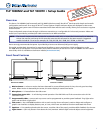
Product Category
Initial Conguration
Before use, configure the touchpanel, using the on-screen menus.
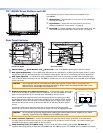
1. Press the Menu button once. (See “TLP 1000MV Reset Buttons and LED“
for the TLP 1000MV or “Rear Panel Features“ for the TLP 1000TV.) The
Main menu screen opens (see figure at right).
2. Touch an on-screen button to highlight and select that option (the button
turns green with a yellow border).
3. Use the Up and Down buttons to adjust the value. Some options have a
single button and toggle between Off and On when the button is pressed.
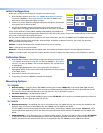
There are five different screens (Main, Volume, Time, Network, and Video) that
can be selected by pressing the appropriate button at the left side of the screen. There is also an Exit button at the bottom
left corner of the screen for leaving the menus.
Use the screens to adjust the following options (for more information, see the TLP 1000MV and TLP 1000TV User Guide).
Main — Adjusts the Sleep timer, Backlight, Auto Backlight, and Wake on Motion functions. The screen also provides
information about the PoE status.
Volume — Adjusts the Master, Click, Sounds, and Line In volume settings.
Time — Sets the correct time and date.
Network — Sets the IP address and the subnet mask, and enables or disables Dynamic Host Configuration Protocol.
Video — Provides a small video preview window and the controls to adjust the video contrast, color, brightness, and tint.
Calibration Menu
1. Press the Menu button a second time to open the calibration-screen. (See
“TLP 1000MV Reset Buttons and LED“ for the TLP 1000MV or “Rear Panel
Features“ for the TLP 1000TV.) The on-screen button in the top left corner
is highlighted.
2. Press the highlighted button until it turns gray and a new button is
highlighted. When all four points have been calibrated, the screen reopens
to the Main Screen.
3. Press Exit to close the on-screen menus.
4. If necessary (for the TLP 1000MV), reattach the faceplate.
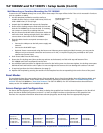
Mounting Options
TLP 1000MV
z Wall-mounting — using the Extron BB 1000M back box (part number 70-887-01) or the Extron EWB 1000 wall box
(part number 70-950-02), either of which must be purchased separately. Follow the instructions provided with the kit.
The unit may also be mounted directly to the wall without a kit, as described on page 4.
z Furniture-mounting — as described on page 4.
z Rack-mounting — using the RM 1000M kit (part number 70-886-01), which must be purchased separately. Follow the
instructions in the user guide provided with the kit.
TLP 1000TV
z Desktop-mounting — by standing the unit on a suitable surface. For added security, the unit may be attached to the
desktop, using two screws, as described in the TLP 1000MV and TLP 1000TV User Guide.
The TLP 1000TV can also be mounted using the Extron SMA-1 Swivel-Mount Adapter (part number 70-747-01), which
must be purchased separately. Follow the instructions provided with the kit and the TLP 1000MV and TLP 1000TV User
Guide.
z VESA-mounting — using the D-type (75 x 75 mm) mounting pattern. The Extron LPVM-1 kit (part number 60-1099-02)
is optional and must be purchased separately. Follow the instructions provided with the kit. To VESA-mount the TLP
1000TV, the base must be removed from the unit, as described in the TLP 1000MV and TLP 1000TV User Guide.
Main
Volume
Time
Network
Video
Exit
On
On
Down Up
Sleep timer: 300 Sec
Down Up
Backlight: 073%
Auto Backlight
Wake on Motion
PoE
Active
+
+
++
Press and Hold
Highlighted Box
Until Color Changes