


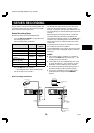


SETTING THE BUZZER
During alarm recording, if the tape reaches the end, if
buttons are pressed, or if there is a VCR mechanical
failure, the tape will stop or be ejected and a buzzer can
be sounded.
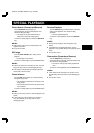
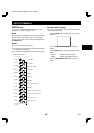
1 Press the MENU button until the (SET UP 2) menu is
displayed.
@@@@@@@<SET@UP@2>
öDISPLAY
@@@DATE@@@@@@@@@@@Y
@@@TIME@@@@@@@@@@@Y
@@@ALARM@COUNT@@@@Y
@@@SPEED@@@@@@@@@@Y
öBUZZER
@@@ALARM@IN@@@@@@@Y
@@@TAPE@END@@@@@@@Y
@@@KEY@IN@@@@@@@@@N
@@@WARNING@@@@@@@@Y
2 Turn the JOG dial, until the desired item for which the
buzzer function will be set is flashing.
3 Turn the SHUTTLE ring to set “Y” for the functions
described below.
ALARM IN . . The buzzer will be heard during
alarm recording.
TAPE END. . The buzzer will be heard when the
end of the tape is reached during
recording. To stop the buzzer,
press the STOP, EJECT or PLAY
button, or turn the SHUTTLE ring.
KEY IN . . . . . The buzzer will be heard when one
of the VCR buttons is pressed or
when the JOG dial or the
SHUTTLE ring is turned.
WARNING . . The buzzer will be heard if the
heads are dirty and recording
qualtiy deteriorate, or if the tape
stops or is ejected due to a
problem with the internal
mechanism. To stop the buzzer,
press the STOP button.
4 Press the SEARCH/AUDIO ON button to save the
setting.
NOTES:
œ If “N” is set, the buzzer will not be heard.
œ During timer recording mode, security lock engaged
mode and alarm recording mode, the buzzer will not be
heard when a button related to one of these modes is
pressed, even if “Y” is set for the “KEY IN” item.
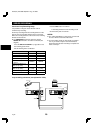
CLOCK ADJUSTMENT
When using 2 or more VCRs of this same model, the
clock on the second VCR and on, can be synchronized
with the clock on the first VCR, using the CLOCK
ADJUSTMENT function.
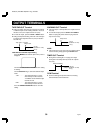
1 Connect the CLOCK SET OUT terminal on VCR 1 to
the CLOCK SET IN terminal on VCR 2.
2 Repeat the procedure for all the other VCRs,
connecting the CLOCK SET OUT terminal on VCR 2
to the CLOCK SET IN terminal on VCR 3, and so on.
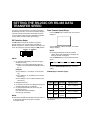
3 Press the MENU button until the (SET UP 3) menu is
displayed.
4 Turn the JOG dial, until the “EXT TIME ADJ.” setting
is flashing.
5 Turn the SHUTTLE ring to set the hour at which the
adjustment will be conducted.
NOTES:
œ Be sure to set the same time on all the VCRs.
œ The clock adjustment cannot be set to “00:00”.
Example
@@@@@@@<SET@UP@3>
öALARM@MODE@@@@@@@Y1
öALARM@DURATION@@@20S
öEXT@TIME@ADJ.@@@@03:00
öTAPE@IN@MODE@@@@@STOP
öTAPE@END@MODE@@@@REW
öTAPE@END@OUT@@@@@-3M
öCLOG@DETECT.@@@@@Y
öSERIES@REC@IN@@@@N
öRS-232C@@@@@@@@@@19200
6 Press the SEARCH/AUDIO ON button to save the
setting.
ø
The setting procedure on the first VCR is now
completed.
7 Repeat the procedure for all the other VCRs, setting
“EXT TIME ADJ.” (to the same time as set on the first
VCR).
NOTES:
œ Connect the COM terminal on all VCRs used.
œ This function will not operate on the day the daylight
saving/standard time is changed.
RC4Q/U (TLS-9960 GB) Mon. Aug., 23/1999
English 35