


6
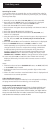
Battery Installation
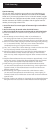
1. On the back of the remote, push down on the
tab and lift the cover off.
2. Match the batteries to the + and - marks inside
the battery case, then insert 2 AAA Alkaline
batteries.
3. Press the battery cover back into place.
Battery Saver
Your remote automatically turns off if the buttons
are depressed more than 30 seconds. This will
save your batteries should your remote get stuck
in a place where the buttons remain depressed
(e.g., between the sofa cushions).
Code Saver
All user programmed settings, except Time, Day, and Date will be stored
in permanent memory while you are changing batteries, so you will not
lose any codes stored in the remote while you are changing batteries.
Time, Day, and Date, will be cleared to the factory defaults when the
batteries are replaced.
Power-On Default
The remote powers on in TV mode.
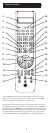
Liquid Crystal Display (LCD)
The LCD lets you see at a glance what mode the remote is in. It also
includes a clock that displays the time and day, and a visual indication
that the remote is transmitting when you press a button.
Code Setup
The SETUP button is used to setup the remote. You can either setup the
remote using the code for your brand of product, from the code tables
(on separate sheet), or you can search through the library of codes until
you find a code that works for your product.
You can store any kind of code under any mode (except TV). I.E. you can
store a VCR code under the CBL button, or a DVD code under the VCR
button, etc. However, you can only store TV codes under the TV button.
The SETUP button is used for programming the remote and accessing
any additional features - e.g. Shifted functions, see below. To enter setup
mode, press and hold the SETUP button until “CODE SETUP” appears in
the display. The “SET” symbol will always be shown when the remote is
in Setup. Successive presses of the SETUP button shows available Setup
options in the order shown below.
1. CODE SETUP – press OK here to program a Mode e.g. Code Entry,
Search, etc. See Code Setup options below.
2. SYSTEM SETUP – press OK here to set Time, Date, Volume Control, etc.
3. TIMER SETUP – press OK here to set Timer events.
4. LEARN SETUP – press OK here to program a Mode with Learned
commands.
5. EXIT SETUP – press OK here to Exit Setup routines and return to
normal operation.
Press OK to select the desired programming step required.
Exit from Setup occurs automatically after approximately 15 seconds if
no buttons is pressed. TIME OUT is displayed.
When the remote is busy processing in Setup routines, “Please Wait” is
displayed.
Setup