


11
PRODUCT INFORMATION
INSTALLATION
10
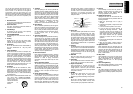
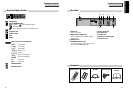
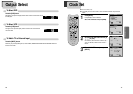
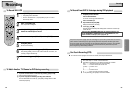
Remote Control
PREV NEXT
6
@
#
!
$
%
^
&
*
(
)
1
2
3
4
5
7
8
9
0
“
‘
+
=
Q
q
W
w
E
e
R
!
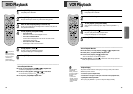
[DVD]
DISC MENU button
@ POWER button
#
[DVD]
TITLE button
$
[DVD, VCR]
EJECT button
%
[DVD, VCR]
MOVE/SELECT in OSD,
[VCR]
Channel
Up/Down button
^ SETUP button
&
[DVD]
REPEAT Playback button
*
[DVD]
A-B REPEAT button
(
[DVD]
PREVIOUS button (skip to previous chapter
or track)
) REVERSE SEARCH button
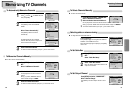
1
[VCR]
TIMER RECORDING button,
[DVD]
PROGRAM
Playback button
2
[DVD, VCR]
CLOCK/COUNTER button
3
[DVD, VCR]
TV/VCR button
4
[VCR]
Record button
5
[DVD, VCR]
0-9 buttons ,
[VCR]
TRACKING –/+ buttons
6 VCR SELECT button
7 DVD SELECT button
8
[DVD, VCR]
OSD DISPLAY button
9 INPUT Selection button
0 ENTER button
“ CLEAR/3D button
‘
[DVD]
AUDIO LANGUAGE Select,
[VCR]
AUDIO Select
button
+
[DVD]
SUBTITLE Select button
=
[DVD]
NEXT button (Skips to next chapter or
track) ,
[VCR]
Frame Advance button in pause
mode
Q PLAY/PAUSE button
q FORWARD SEARCH button
W STOP button
w
[DVD]
Chapter/Title/Time SEARCH button
E
[DVD]
ZOOM button
e
[DVD]
ANGLE,
[VCR]
Record SPEED button
R
[DVD]
PROGRESSIVE SCAN/INTERLACE SCAN Select
button,
[VCR]
100 button
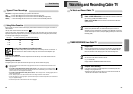
Press the power [√] button on the remote control
for about 8 seconds. All front panel and remote
cotnrol buttons are now locked, and the Lock
indicator (“ ”) will be displayed on window
display. To release child lock, press the power [√]
button again for about 8 seconds.
Child Lock!!!
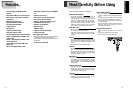
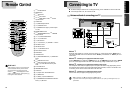
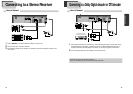
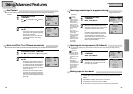
Various methods of connecting your TV
AUDIO
VIDEO
S-VIDEO
ANT INPUT
S-VIDEO INPUT
A/V INPUTCOMPONENT INPUT
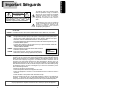
CAUTION
CAUTION: TO REDUCE THE RISK OF ELECTRIC SHOCK.
DO NOT REMOVE COVER (OR BACK).
NO USER SERVICEABLE PARTS INSIDE.
REFER SERVICING TO QUALIFIED SERVICE PRESONNEL.
RISK OF ELECTRIC SHOCK
DO NOT OPEN
2018161412108643
21191715131197531
DVD ONLY
DVD + VCR
AUDIO
OUT
R
L
R
L
Y
Pr
Pb
DIGITAL
AUDIO OUT
COAXIAL
COMPONENT
VIDEO OUT
VIDEO
OUT
VIDEO 1
IN
IN
(FROM ANT.)
OUT
(TO TV)
RF
S-VIDEO OUT
AUDIO
VIDEO
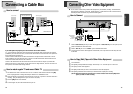
Method
Method
1
1
Remove RF cable plugged into “ANT.IN” Jack on rear panel of TV. Connect this RF cable to “ANT.IN” jack on
rear panel of DVD+VCR. Connect TV to DVD+VCR. Connect “RF OUT” jack on DVD+VCR to “ANT.IN” jack on TV
with RF cable.
Method
Method
2
2 : Connecting to a TV equipped with audio/video in jacks
Connect VIDEO OUT jack on DVD+VCR to VIDEO IN jack on TV, and AUDIO OUT jack on DVD+VCR to AUDIO IN
jack on TV with the supplied audio/video cable. Select VCR mode by pressing TV/INPUT button on your TV.
Method
Method
3
3 : Connecting to a TV equipped with component video in jacks
Use a component video cable (not supplied) in place of the yellow video cable to enjoy higher quality pictures.
The component video connection only works in DVD playback mode. Therefore, in order to use the VCR or view
TV channels, you still need to connect the RF cable or the video cable.
Method
Method
4
4 : Connecting to a TV equipped with S-Video in jacks
Use an S-Video cable (not supplied) to enjoy higher quality pictures.
■ The default RF Output channel is CH3. To change this setting, use the "CHANNEL SET" screen in VCR mode.
■ In connecting RF cable to TV, set TV channel to CH3.
Connecting to TV
• VHF: TV channels 2~13, UHF: TV channels 14~69, CATV: Cable TV
• If you do not receive a clear picture using the Component Video Pr, Pb, Y jacks, try connecting to the Cr, Cb, Y
jacks instead.
<Outside Antenna or Wall Antenna Outlet>
<Rear Panel of DVD+VCR>
<Rear Panel of TV>
Method 1
Method 2
Method 3
Method 4