


14
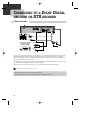
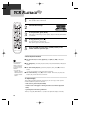
CONNECTING OTHER VIDEO EQUIPMENT
How to Connect
AUDIO
VIDEO
ANT INPUT
A/V OUTPUT
CAUTION
CAUTION: TO REDUCE THE RISK OF ELECTRIC SHOCK.
DO NOT REMOVE COVER (OR BACK).
NO USER SERVICEABLE PARTS INSIDE.
REFER SERVICING TO QUALIFIED SERVICE PRESONNEL.
RISK OF ELECTRIC SHOCK
DO NOT OPEN
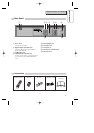
2018161412108643
21191715131197531
DVD ONLY
DVD + VCR
AUDIO
OUT
R
L
R
L
Y
Pr
Pb
DIGITAL
AUDIO OUT
COAXIAL
COMPONENT
VIDEO OUT
VIDEO
OUT
VIDEO 1
IN
IN
(FROM ANT.)
OUT
(TO TV)
RF
S-VIDEO OUT
AUDIO
VIDEO
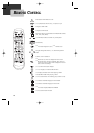
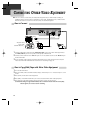
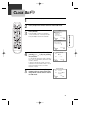
How to Copy (Edit) Tape with Other Video Equipment
1 Connect audio/video cables from the Audio/Video Out jack on your other video equipment to
the Audio/Video In jack on rear panel (or front panel) of DVD+VCR.
2 Connect an RF cable from the “ANT. IN” jack on a TV or satellite receiver to the “RF.OUT” jack
on the DVD+VCR.
3 To record other video equipment with the DVD+VCR, insert a tape with the record safety tab
intact into DVD+VCR and follow the instructions for recording on page 24.
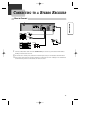
1 Turn on the DVD+VCR.
2 Press [TV VIEW] and set the DVD+VCR to display “External Input 1” or “External Input 2” on TV
screen.
3 Press [PLAY] on the other video equipment.
4 Press [REC] on the DVD+VCR when you want to record from the other video equipment.
5 Press [Pause] on the DVD+VCR to prevent recording a scene you do not want.
(Caution) Recording is stopped automatically after 5 minutes in Pause mode. Press the [REC]
button again if you want to resume recording.
Playback VCR,
Camcorder,
Satellite Receiver ...
...
...
RF Cable
AUDIO/VIDEO Cable
■ You can connect a wide variety of audio/video equipment to your DVD+VCR, including an
additional VCR, Laser Disc Player, DVD Player, Camcorder, Satellite Receiver, or Video Game.
Because these devices use all of connections, they are described together.