


ENGLISH
28
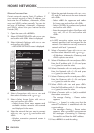
Manual connection
Certain networks require Static IP address. If
your network requires a Static IP address, you
must enter the »IP Address«, »Netmask«, »Gate-
way« and »DNS« values manually. You can ob-
tain your »IP Address«, »Netmask«, »Gateway«
and »DNS« values from your Internet Service
Provider (ISP).
1 Open the menu with »MENU«.
2 Select »CONNECTED APPS« with »
V
« or »
Λ
«
and confirm with »OK«. Menu is displayed.
3 Select »Network Settings« with »
V
« or »
Λ
«
and confirm with »OK«.
– »NETWORK SETTINGS« menu is displayed.
4 Select »Connection« with »
V
« or »
Λ
« and
then select »Wireless« with »
<
« or »
>
«.
5 Select »Select Access Point« with »
V
« or
»
Λ
« and confirm with »OK«.
– »Select Access Point« menu appears and
available wireless networks are scanned
and displayed in the menu.
6 Select the network that you want to connect
with »
V
«, »
Λ
«, »
<
« or »
>
« and confirm with
»OK«.
– Wireless connection password screen is
displayed.
HOME NETWORK
------------------------------------------------------------------------------------------------------------
7 Select the required character with »
V
«, »
Λ
«,
»
<
« and »
>
« and move to the next character
with »OK«.
– Select »ABC« for uppercase and »abc«
for lower case and confirm with »OK«.
– Select »?@123« for numbers and symbols
and confirm with »OK«.
– Enter the password, select »Confirm« with
»
V
«, »
Λ
«, »
<
« or »
>
« and confirm with
»OK«.
Note:
7
In WEP encryption system, more than one
network password can be assigned for the
network. Your television can only connect to
network with level 1 password.
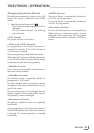
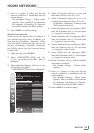
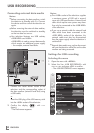
8 Select »Connection Type« with »
V
« or »
Λ
«
and then select »Manual« with »
<
« or »
>
«.
– »IP Address«, »Netmask«, »Gateway« and
»DNS« options are active.
9 Select »IP Address« with »
V
« and press »OK«.
Enter the IP address with »1…0« and press
»
« (green) to save the value.
10 Select »Netmask« with »
V
« and press »OK«.
Enter the Netmask with »1…0« and press
»
« (green) to save the value.
11 Select »Gateway« with »
V
« and press »OK«.
Enter the Gateway with »1…0« and press
»
« (green) to save the value.
12 Select »DNS« with »
V
« and press »OK«.
Enter the DNS address with »1…0« and press
»
« (green) to save the value.
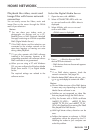
13 Select »Connect« with »
« (red) to establish
the modem connection.
– The mesage »Testing ... Please waite«
appears.
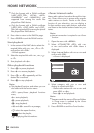
14 Press »
« (green) to make sure that the
network connection is established with the
current settings.
– The messages »Testing ... Please waite«
appears, after successfull announcement
the messages »Connecting To Gateway:
Successful« and then the MAC address.
15 Press »MENU« to end the setting.
Connection
Netmask
255.255.255.0
IP Address
Select Access Point
Connection Type
192.168.1.100
- -
Auto
Gateway
DNS
Exit
Back
Connection Settings
Wireless
Test
Connect
CONNECTED APPS
NETWORK SETTINGS
192.168.1.1
192.168.1.1