


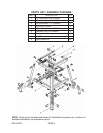

6. Insert two Carriage Bolts (part #7) through the aligned mounting holes of the
Bottom Long Brace (part #2) and two Legs (part #4). Attach the Spring Washers
(part #9), and Nuts (part #8) to the Carriage Bolts and loosely tighten.
7. Repeat Steps #5 and #6 above to attach the remaining Bottom Long Brace (part
#2) to the two remaining Legs (part #4).
8. Position a Bottom Short Brace (part #5) with each of its ends resting above each
end of the two Bottom Long Braces (part #2). NOTE: Make sure to align the
mounting hole located at the top of each end of the Bottom Short Brace with the
mounting hole located at the top of each end of the Bottom Long Brace. Also,
align the the mounting hole located at the side of each end of the Bottom Short
Brace with a mounting hole located on the lower, inside edges of the two Legs
(part #4).
9. Insert two Carriage Bolts (part #7) through the aligned mounting holes of the
two Legs (part #4) and Bottom Short Brace (part #5). Then, insert two Carriage
Bolts through the aligned mounting holes of the Bottom Short Brace and the two
Bottom Long Braces (part #2). Attach the Spring Washers (part #9), and Nuts
(part #8) to the Carriage Bolts and loosely tighten.
10. Repeat Steps #8 and #9 above to attach the remaining Bottom Short Brace (part
#5) to the remaining Bottom Long Brace (part #2) and remaining two Legs (part
#4).
11. Align the mounting hole located at each end of a Top Long Brace (part #1) with a
mounting hole located on the upper, inside edges of two Legs (part #4).
12. Insert two Carriage Bolts (part #7) through the aligned mounting holes of the Top
Long Brace (part #1) and two Legs (part #4). Attach the Spring Washers (part
#9), and Nuts (part #8) to the Carriage Bolts and loosely tighten.
13. Repeat Steps #11 and #12 above to attach the remaining Top Long Brace (part
#1) to the two remaining Legs (part #4).
14. Position a Top Short Brace (part #3) with each of its ends resting above each end
of the two Top Long Braces (part #1). NOTE: Make sure to align the mounting
hole located at the top of each end of the Top Short Brace with the mounting hole
located at the top of each end of the Top Long Brace. Also, align the mounting
hole located at the side of each end of the Top Short Brace with a mounting hole
located on the upper, inside edges of the two Legs (part #4).
15. Insert two Carriage Bolts (part #7) through the aligned mounting holes of the two
Legs (part #4) and Top Short Brace (part #3). Then, insert two Carriage Bolts
SKU 46075 PAGE 5