


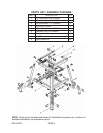

through the aligned mounting holes of the Top Short Brace and the two Top Long
Braces (part #1). Attach the Spring Washers (part #9), and Nuts (part #8) to the
Carriage Bolts and loosely tighten.
16. Repeat Steps #14 and #15 above to attach the remaining Top Short Brace (part
#3) to the remaining Top Long Brace (part #1) and remaining two Legs (part #4).
17. Place the Tool Stand at the location where it will used. With the aid of a corner
square and/leveler, make sure the top of the Tool Stand is level. Then, WRENCH
TIGHTEN all of the Carriage Bolts (part #7).
To Attach A Plywood Top To The Tool Stand:
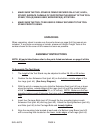
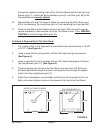
1. Cut a piece of 5/8” or 3/4” plywood (not provided) to the measurements of 18-3/8”
x 20-1/2”. (See Figure A.)
2. Using a wood drill bit (not provided), drill four 3/8” holes through the plywood.
(See Figure A.)
3. Using a metal drill bit (not provided), drill two 3/8” holes through each of the two
Top Long Braces (part #1). (See Figure A.)
4. Place the plywood on the top of the Tool Stand, and insert four 3/8” Bolts (not
provided) downward through the holes in the plywood and through the aligned
holes in the Top Long Braces (part #1).
5. Attach four Lockwashers (not provided) and four Nuts (not provided) to the four
Bolts, and wrench tighten to secure the plywood to the top of the Tool Stand.
5/8 OR 3/4 THICK PLYWOOD
TOP LONG BRACE (#1)
3/8” DIA.
HOLE
3/8” DIA.
HOLE
20-1/2”
20-1/2”
18-3/8”
18-3/8”
FIGURE A
SKU 46075 PAGE 6
4”
4”
1-1/2” 1-1/2”