


30
Specifying the Disc Status Created when the Disc was Finalized
It is possible to specify the action when a finalized disc is inserted into this machine or a DVD player, or the operation when
playback of a title is finished. Also, it is possible to select whether to create a title menu (TOP MENU) or chapter menu (MENU)
when finalizing or closing a title. It is necessary to carry out the setting before recording to a blank disc. The setting is carried out
with the DISC IN ACTION Item, TITLE END Item or DVD MENU TYPE Item of the DISC MENU screen.
Operation
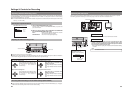
ⅥThe disc should be not inserted, or a blank disc should be inserted.
1.
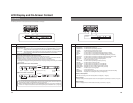
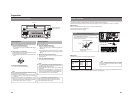
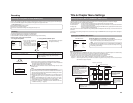
Display the DVD MENU screen
qPress the SET UP button and the set up top menu screen will be displayed.
wPress either the 6 or 7 button to select the DVD MENU item, then press
the SET button.
2.
Set the DVD MENU menu screen
qWith the 6 or 7 buttons, select Item, press the SET button and the setting
value list box will be displayed.
wWith the 6 or 7 buttons, select the setting value, press the SET button to
confirm the setting value.
3.
Finish the Setting
Carry out either of the following operations.
• Select the MENU item, press the SET button to return to the set up top
menu screen.
• Press the SET UP button to return to the normal screen.
EXIT
DISC
INPUT SELECT
SYSTEM
DVD MENU
RECORDER
REMOTE
DISPLAY
CLOCK ADJUST
NETWORK
Set up top menu screen
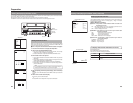
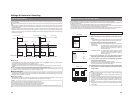
DVD MENU screen
ⅥDVD MENU TYPE Item
This is for selecting whether to create a title menu (TOP MENU) or a chapter menu (MENU) when finalizing or closing a title.
ⅥDISC IN ACTION Item
This is to set the operation when a finalized disc is inserted into this machine or a DVD player.
ⅥTITLE END Item
This is to set the operation when playback of a title is finished.
* Settings cannot be changed after the title is recorded. Setting is possible only when there is no disc inserted or when a blank
disc is inserted. Please see page 66 for details.
MENU
STYLE
TYPE1
THUMNAIL FORM
NORMAL
CAPTER PATERN
1
TITLE PATERN
1
DISC IN ACTION
TITLE
TITLE END
NEXT TITLE
DVD MENU TYPE
TOP
EDIT MENU
DISABLE
DVD MENU
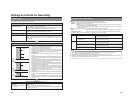
Settings & Controls for Recording
31
Setting the Encoding Format for Audio & Video
The setting of encoding formats for audio and video is carried out from the RECORDER MENU (1/2) screen as described below.
Setting Encoding Formats
ⅥStop the DVD recorder.
1.
Open the RECORDER MENU (1/2) screen.
q Press the SET UP button to display the Setup Menu.
w Select RECORDER using the 6 and 7 buttons and then press the SET
button.
2.
Make the required settings on the RECORDER MENU (1/2)
screen.
q Select the parameter to be set using the 6 and 7 buttons, and then
press the SET button to display a list of possible settings.
w Select the required setting using the 6 and 7 buttons, and then press
the SET button to adopt it.
3.
Complete the setting process.
To do so, carry out one of the following procedures.
• Select MENU and press the SET button to return to the Setup Menu.
• Press the SET UP button to return to the normal screen display.
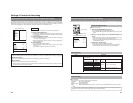
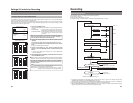
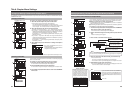
RECORDER MENU (1/2) screen
Audio Encoding
ⅥAUDIO ENCODE
This parameter is used to set the encoding format for audio data.
NO AUDIO : Do not record audio sound.
LPCM : Linear PCM encoding
DOLBY DIGITAL: Dolby AC3 encoding.
MPEG : MPEG encoding (Effective only when the TV TYPE item from SYSTEM MENU (2/2) screen is set to PAL.)
Note
If the SET UP button is pressed while in Recording mode, the video encode quality and audio encoding format will be
displayed on-screen. Press the SET UP button once again to hide this information.
MENU
CHAPTER CREATION
MANUAL
SET INTERVAL
Every05Min
AUTO CHAPTER (RECPAUSE)
ON
ENCODE QUALITY
SP
AUDIO ENCODE
DOLBY DIGITAL
RECORDER MENU (1/2)
Video Encoding
Item Description
ENCODE QUALITY For setting the recording quality. Recording quality and time vary with the set values as follows:
(For a 4.7 GB disc)
* Only UXP, XP or SP can be selected when the AUDIO ENCODE item is set to LPCM.
Set Value
Recording
Time
Picture Quality Upload Size
UXP (NOT DVD VIDEO)
XP
SP
LP
EP
DLP (Double LP)
DEP (Double EP)
40 mins
60 mins
120 mins
180 mins
240 mins
360 mins
480 mins
High
∞
Normal
√
Low
√
D1: NTSC= 720 x 480 dots
PAL= 720 x 576 dots
HalfD1: NTSC = 352 x 480 dots
PAL= 352 x 576 dots
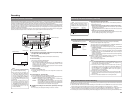
SET UP button
SET button
BUSY
OPEN/CLOSE
TOP
MENU MENU
OPTIONDV Y/CLINE
SET UP
SET