


No.51843
C-T1421
9
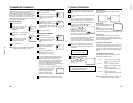
SETTING LANGUAGE
This TV can display the channel number, on-screen displays and picture adjustments on the screen in English, Spanish or
Portuguese.
On-screen language selection (step 3) will automatically appear on the screen when you press the MENU button initially.
Select the language you prefer first, then proceed with the other menu options.
NOTE:
If Spanish or Portuguese is chosen, the Closed Caption indicators will be in the selected language, but the Closed Caption
text will not be affected by the language selection.
Press the SET + or – button
until the "
" indicator points to
the desired language: English
(ENGLISH), Spanish
(ESPAÑOL) or Portuguese
(PORTUGUES), then press the
ENTER button.
1
2
3
4
Press the MENU button.
Press the SET + or – button to
select the LANGUAGE mode,
then press the ENTER button.
Press the MENU button.
LANGUAGE / IDIOMA
CH SET UP
PICTURE
CLOCK SET
ON/OFF TIMER
M E N U
COLOR AUTO
〈
+ / — / ENTER / MENU
〉
LANGUAGE / IDIOMA
〈
+ / — / ENTER / MENU
〉
Press the MENU button.
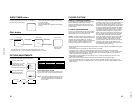
SETTING CLOCK
You must set the time manually for CALL and ON/OFF TIMER.
Press the SET + or – button to set the minute.
If you want to change the hour, press the
RESET button.
1
2
3
Press the ENTER button.
Press the SET + or –
button to set the hour, then
press the ENTER button.
NOTES:
• After a power failure, disconnection of the power
plug or turning the TV power off by pressing the
POWER button on the front panel, the time
display will be lost. In this case, set present time
again.
• When you set the minute, you can change in 10-
minutes by holding down the SET + or – button.
Press the SET + or – button
until the indicator next to
"CLOCK SET" begins to flash,
then Press the ENTER button.
LANGUAGE / IDIOMA
CH SET UP
PICTURE
CLOCK SET
ON/OFF TIMER
M E N U
COLOR AUTO
〈
+ / — / ENTER / MENU
〉
〈
+ / — / ENTER / RESET / MENU
〉
CLOCK SET
10 : 00
CLOCK SET
0 : 00
〈
+ / — / ENTER / RESET / MENU
〉
4
5
COLOR SYSTEM
The color system is automatically selected, but if the picture is not clear or no color appears, select the color system
manually.
1
Press the MENU button.
2
Press the SET + or – button to select
the “COLOR” option then press the
ENTER button.
3
Press the ENTER button to select the
desired COLOR SYSTEM.
4
Press the MENU button.
AUTO PAL-N PAL-M NTSC
LANGUAGE / IDIOMA
CH SET UP
PICTURE
CLOCK SET
ON/OFF TIMER
M E N U
COLOR AUTO
〈
+ / — / ENTER / MENU
〉
LANGUAGE / IDIOMA
CH SET UP
PICTURE
CLOCK SET
ON/OFF TIMER
M E N U
COLOR PAL-M
〈
+ / — / ENTER / MENU
〉
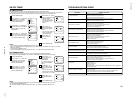
8
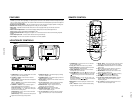
STAND BYON TIMER
VIDEO
—
AV2 IN
—
AUDIO
EARPHONES
TV GAME
If you connect the TV to VCR, camcorder, TV game or DVD you can select by pressing the TV/AV button.
CONNECTION TO OTHER EQUIPMENT
The exact arrangement you use to interconnect various video and audio components to the TV is dependent on the model
and features of each component. Check the User’s Guide provided with each component for the location of video and audio
inputs and outputs.
The connection diagrams in the following are offered as suggestions. You may need to modify them to accommodate your
particular assortment of components. The diagrams are intended to show component video and audio interconnections only.
Press the TV/AV button to select the AV mode to use the TV as a monitor.
Operate your VCR as usual.
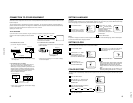
TV/AV SELECTION
1. To connect the TV to a VCR
(ex. Use AV 1 IN jacks to connect it.)
AV1
Press the TV/AV button repeatedly to select the desired
mode.
3. To connect the TV to a camcorder
To playback from the camcorder, connect the camcorder
to the TV as shown.
An indication of input source will display
on the screen for 4 seconds.
AUDIO
AV1 IN
VIDEO
VIDEO AUDIO
Rear of TV
VCR
To Audio/
Video OUT
(not supplied)
STAND BY ON TIMER
VIDEO
—
AV2 IN
—
AUDIO
EARPHONES
Front of TV
To Audio
Video OUT
(not supplied)
VIDEO
AUDIO
TV AV 1 AV 2
The TV can also be used as a display device for many
video games. However, due to the wide variety of
different types of signal generated by these devices and
subsequent hook-up variations required, they have not
all been included in the suggested connection diagrams.
You'll need to consult each component's Owner's
Manual for additional information.
2. To connect the TV to a TV Game
To Audio/Video OUT
(not supplied)
Front of TV
• Select “AV 1” by pressing the TV/AV button to display
the VCR picture.
• Select “AV 2” by pressing the TV/AV button to display
the camcorder picture.
• Select “AV 2” by pressing the TV/AV button to display
the TV GAME picture.