


EN 5
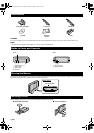
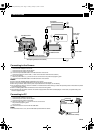
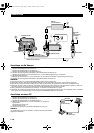
Connecting to the Camera
A Connect the AC adapter to the burner.
B Connect the power cord to the AC adapter.
C Connect the power cord to an AC outlet.
D Connect the provided USB cable to the USB connector of the burner.
E Connect the camera to an AC outlet. (੬ Refer to the instruction manual for the camera.)
F Turn on the camera.
G Press the power button
(C/B) on the front to turn on the burner. The power lamp lights in green.
H Connect the provided USB cable to the USB connector of the camera.
NOTES:
●Insert a disc after [INSERT DISC] is displayed on the camera.
●Be sure to use the provided USB cable to connect the burner and the camera.
●When using a camera, make sure the power is provided with the AC adapter, not the battery.
●Do not subject the camera or burner to vibration or mechanical shock while writing to a disc. Be especially careful if the camera is placed
on the burner during writing.
●Refer to “Dubbing Video Files To DVD Discs” in the manual for writing discs.
●The DVD discs that are written with this unit cannot be played with some DVD recorders/players. In that case, use [PLAY DVD] of the
camera to playback discs.
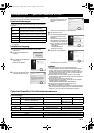
Connecting to PC
A Connect the AC adapter to the burner.
B Connect the power cord to the AC adapter.
C Connect the power cord to an AC outlet.
D Press the power button
(C/B) on the front to turn on the burner.
The power lamp lights in green.
E Turn on the PC.
F Connect the burner to the PC with the USB cable.
NOTE:
To connect the burner to a PC, use the USB cable provided with the camera.
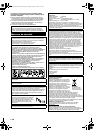
Connections
A
B
C
D
E
F
G
H
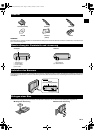
USB Cable (Provided)
AC Adapter
(provided for the burner)
Power Cord
(Provided)
To AC Outlet
To DC Connector
To USB Connector
Hard Disk Camera
Rear of burner
AC Adapter (provided for the camera)
USB Cable
(provided for the camera)
AC Adapter
(provided for the burner)
Power Cord
CU-VD20_Instruction_EN.fm Page 5 Tuesday, January 23, 2007 2:43 PM