


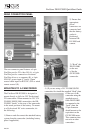


5) Once mounted, secure the two captive
screws at the base of DR-DV5000 to
the camcorder.
6) Re-attach the battery system to the rear
of the DR-DV5000. Ensure to connect all
power cables and utilize the supplied gasket
between DR-DV5000 and the battery system.
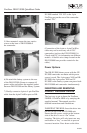
7) Finally, connect a 6-pin to 4-pin FireWire
cable from the 6-pin FireWire port on DR-
DV5000 marked “DV I/O” to the 4-pin
FireWire port on the rear of the camcorder
marked “DV”.
(Connection of the 6-pin to 4-pin FireWire
cable may not be necessary on all JVC
camcorders (such as the GY-DV5000U(A).
Check with JVC for information on different
models. A flexible wire clamp located on the
DR-DV5000 base provides restrain for the
cable).
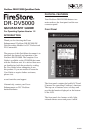
Power Options
The DR-DV5000 shares power with the GY-
DV5000 camcorder no matter which power
source is used. The 4-pin power XLR on DR-
DV5000, the 4-pin power XLR on GY-
DV5000 or the battery system can power both
DR-DV5000 and camcorder simultaneously.
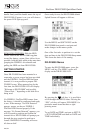
INSERTING AND REMOVING
FSHDD-1 FIREWIRE DRIVES
The best way to get to know the FireStore
FSHDD-1 FireWire HDD is by studying the
supplied manual. The manual provides
detailed instructions and illustrations.
INSER
TING THE HDD: Insert the drive into
the slot on top of the DR-DV5000 unit.
Ensure that the power switch on the bottom
side of the drive is set to “On” before
inserting. The drive will only insert one way
and features a “key” on one side to prevent
incorrect insertion. Press down on the drive
FireStore DR-DV5000 QuickStart Guide
PAGE 3