


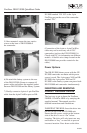


handle firmly until the handle meets the top of
DR-DV5000. If power is on, you will observe
the power LED light up green.
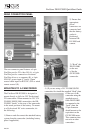
REMOVING
THE HDD: Slide the HDD
release latch on the DR-DV5000 top plate
toward the battery system. Once slid as far as
possible, hold the latch while at the same time
grasping the FSHDD-1 drive handle and
pulling the HDD out from DR-DV5000.
GETTING STARTED
Once DR-DV5000 has been mounted to a
camcorder, a power source has been provided
and the FSHDD-1 FireWire HDD has been
inserted, it is now possible to prepare DR-
DV5000 for use. When powered up for the
first time, the DR-DV5000 LCD will display
“Welcome to DR-DV5000” and possibly
“Please Wait...” depending on the disk drive
being used.
If a FSHDD-1 FireWire HDD comes from
the factory, it should be configured and ready
to use. If the message “No Disk Detected”
appears, ensure you have a FSHDD-1
FireWire HDD inserted properly. If the
message “No Format Detected” appears, you
will first need to partition and format the
inserted drive. DR-DV5000 will prompt you
through the steps required to perform a
format. WARNING: Formatting will erase
all data on disk!
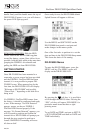
Once ready for use, the DR-DV5000 default
Splash Screen will appear as follows:
Use the MENU and SOFT KEYS on the
DR-DV5000 front panel to navigate and
make changes in the menu system.
One of the first tasks to perform is to set the
date and time in the DR-DV5000 Setup menu.
This forms the basis of file naming.
DR-DV5000 Menus
To enter the DR-DV5000 menu , press the
MENU soft key. The MENU screen will
display on the DR-DV5000 LCD.
By pressing the soft key, it is possible to
scroll through the MENU items. Pressing the
“SEL” soft key will open a SUB-MENU for
particular menu items that have a right
pointing arrow.
To set DATE and TIME, navigate to SETUP -
> SET DATE&TIME and then set DATE and
TIME individually.
FireStore DR-DV5000 QuickStart Guide
PAGE 4