


Masterpage:Right-FullCol
EN 75
Filename [HM-DH5U_Eng.fm]
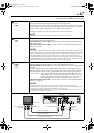
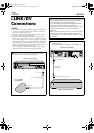
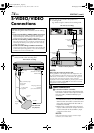
B Connection with the VCR
Connect an audio/S-video cable between the
playback VCR’s audio/S-video output
connectors and the recording VCR’s [AUDIO/
S VIDEO INPUT] connectors.
•When using this VCR as the recording VCR,
connect this VCR’s [AUDIO/S VIDEO
INPUT] connectors to the audio/S-video
output connectors on the other VCR.
If the playback VCR is monaural, connect
the audio output connector on the playback
VCR to the [AUDIO L INPUT] connector on
this VCR.
NOTE:
If another VCR does not have S-video input/output
connectors, use a video cable.
B Load a cassette
Insert the cassette to be recorded on into this VCR
(for recording).
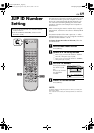
C Select input location on this VCR
[L-1] or [L-2] — when connecting the device to
the [AUDIO/VIDEO INPUT] or
[AUDIO/S VIDEO INPUT]
connectors on the rear panel.
[F-1] — when connecting the device to
the [AUDIO/VIDEO] or
[AUDIO/S VIDEO] input
connectors on the front panel.
On the front panel:
Press [CHANNEL +/–].
On the Remote:
Press the ‘Number’ key [0 (AUX)] or
[TV/VCR CH +/–].
NOTE:
When using this VCR as the recording VCR, set the
video input terminal setting correctly. This setting
selects either the S-Video or composite video (
A page
65).
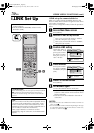
D Set recording speed
Press [REC SPEED] to set the tape speed.
E Select video input terminal
Access the “IN/OUT FUNCTION” screen (A
page 65).
When using [S VIDEO] terminal, set “FRONT
AUX F-1” (or “REAR AUX L-1” (or “L-2”) if you
use the connectors on the rear) to “S-VIDEO”.
When using [VIDEO] terminal, set “FRONT AUX
F-1” (or “REAR AUX L-1” (or “L-2”) if you use the
connectors on the rear) to “VIDEO”.
F Set “PICTURE CONTROL” to
“EDIT”
Access the “VIDEO FUNCTION” screen (A page
63).
G Start playback
Press [PLAY (I)] on the connected device.
NOTE:
If the connected device is equipped with a superimpose/
OSD disable feature then set it to “OFF” before starting
playback.
H Start recording
On the front panel:
Press [REC (R)].
On the Remote:
Press [REC (R)] and [PLAY (I)] at the same time.
NOTES:
• Be sure to select “AUTO” for “PICTURE CONTROL” (or
“NORM” when “V. CALIBRATION” is set to “OFF”) after you
finish dubbing the tapes (
A page 63).
• It is impossible to perform dubbing properly only with an
audio cable. Connect also the video or S-video cable.
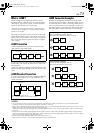
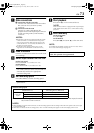
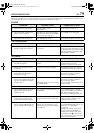
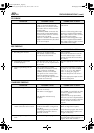
Input Source
(Playback device)
Selectable Recording Speed
(Recording device: This VCR)
D-VHS HS, STD, LS3
S-VHS/VHS SP, EP
Analog
input
To use a Master Edit Control-equipped JVC
camcorder
A Access the “ADDITIONAL” screen (A page 66),
then set “AV COMPU-LINK” to “OFF” after per-
forming step
F.
•The REMOTE PAUSE/AV COMPULINK
connector works as a Remote Pause connector
when “AV COMPU-LINK” is set to “OFF”.
•For details, refer to the camcorder’s instruction
manual.
B Engage the VCR’s recording pause mode.
HM-DH5U_Eng.fm Page 75 Friday, June 25, 2004 11:42 AM