


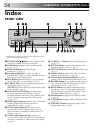


57
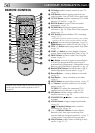
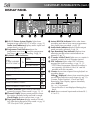
w WEEKLY Button enables timer recording of
weekly serials. ੬ pg. 13, 15
e AUX Button selects recorder's auxiliary input
mode. ੬ pg. 30
r ‰ Button engages timer-standby mode. ੬ pg. 13,
15
t DATE +/– Button inputs date of programme for
timer recording. ੬ pg. 14
y TV PROG +/– Button — same as button on
recorder. ੬ pg. 10
u 30 SEC Button initiates a 30-second period of
fast-motion playback. ੬ pg. 18
i Auto Tracking Button enables/disables auto
tracking mode during playback ੬ pg. 17
SP/LP Button selects tape speed. ੬ pg. 10
o Play Button — same as button on recorder.
੬ pg. 8, 9
p Fast Forward [FF] Button fast-forwards tape ੬ pg.
8; initiates high-speed forward search. ੬ pg. 9
Q Pause Button — same as button on recorder.
੬ pg. 9
W OK Button enters selections made in on-screen
menus. ੬ pg. 22
E Button initiates functions such as Index
Search ੬ pg. 18, variable-speed search, frame
by frame playback. ੬ pg. 9, 20
TV +/–Button controls volume of connected
TV. ੬ pg. 28
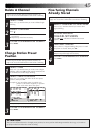
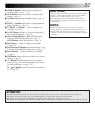
How To Use
The remote control can operate most of your video recorder's
functions, as well as basic functions of TV sets and satellite
receivers of JVC and other brands. ੬ pg. 28, 29.
● Point the remote control toward the sensor window.
● The maximum operating distance of the remote control
is about 8 m.
NOTES:
●
When inserting the batteries, be sure to insert in the
correct directions as indicated under the battery cover.
●
If the remote control doesn't work properly, remove its
batteries, wait a short time, replace the batteries and then
try again.
%
%
ATTENTION
The remote control can operate not only the video recorder but also some of your TV and satellite receiver's functions.
● To operate your video recorder, first press the VCR button to set the remote control to the Video mode.
● To operate your TV, first press the TV button to set the remote control to the TV mode (੬ pg. 28).
● To operate your satellite receiver, first press the SAT button to set the remote control to the Satellite Receiver mode (੬ pg. 29).