


Masterpage:Right-NoTitle0
55
Filename [DVS3EK_3-EN.fm]
Page 55 November 5, 2001 1:37 pm
A
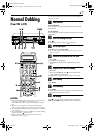
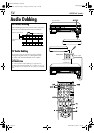
Make connections.
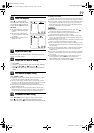
Connect an audio component to the AUDIO L + R input
connectors on the recorder’s front panel.
● When connecting a monaural audio component, use only the
recorder’s AUDIO L input connector.
B
Load a cassette.
For the VHS deck
Insert a VHS (or S-VHS) cassette with the record safety
tab intact, or cover the hole using adhesive tape.
For the DV deck
Insert a Mini DV cassette with the erase protection switch
set to “REC”.
C
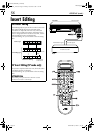
Select the recording deck.
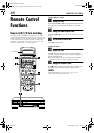
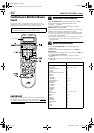
Press
VHS
or
DV
.
● When using the DV deck as the recording deck, press so
that the audio signals from the AUDIO L + R input connectors
can be recorded. The dubbing direction indicator ( VHS)
lights.
D
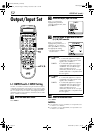
Set the recorder’s input mode.
Press
AUX
(
number key
“
0
”) and/or
PR
to select “F-1”.
E
Locate the start point.
Press
4
to start playback of the tape in your recorder, and
press
9
when you reach the point where you want to start
dubbing.
F
Engage the Audio Dubbing mode.
Press
A.DUB
.
● Your recorder enters the Audio Dubbing Pause mode. (“o
”
blinks, “
u
” and “
i
” light up on the front display panel.)
● To perform Audio Dubbing with audio mixing, press
AUDIO
to select “HI FI L
jh
R” or “L
jh
R” at this point. When
using the DV deck as the recording deck, also make sure that
“12BIT MODE” is set to “SOUND1” (
੬
pg. 71).
* Audio Dubbing with audio mixing is not possible if you are using a
monaural audio component, or if you don’t have an audio mixer.
G
Start dubbing.
Engage the audio component’s Play mode, then press
4
to start the tape in your recorder; Audio Dubbing begins
at this point.
● “o
” blinks and “
u
” is displayed on the front display panel.
● To stop dubbing temporarily, press
9
. Press
4
to resume
dubbing.
H
End Audio Dubbing.
Press
8
to stop the tape in your recorder, and engage the
audio component’s Stop mode.
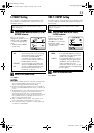
NOTES:
●
Once the Audio Dubbing starts, you can not use the other
deck.
●
When monitoring the audio-dubbed sound on the DV deck,
set “12BIT MODE” to “SOUND2” (
੬
pg. 71).
●
When monitoring the sound during Audio Dubbing, the
normal soundtrack is automatically selected. If you wish to
hear the mixed sound (Hi-Fi + Normal soundtracks), press
AUDIO
to select “HI FI NORM” (
੬
pg. 25). (VHS deck only)
●
Audio Dubbing stops automatically when the counter reaches
“0:00:00”, and the recorder enters the Play mode. Check the
counter reading before dubbing. (VHS deck only)
●
Audio Dubbing is also possible using the rear panel AV1 (L-1)
IN/OUT or AV2 (L-2) IN/DECODER connector. When using
these 21-pin SCART connectors, be sure to select the correct
input mode (“L-1” or “L-2”) in step
4
.
●
When playing back an audio-dubbed tape on the VHS deck,
press
AUDIO
on the remote control to select the soundtrack
you wish to hear (
੬
pg. 25). When playing back an audio-
dubbed Mini DV tape on the DV deck, set “12BIT MODE” to
“SOUND2” (
੬
pg. 71).
●
Audio dubbing is not possible using the DV IN/OUT
connector.
●
Audio dubbing is not possible on a blank portion of the tape.
DVS3EK_1-EN.book Page 55 Monday, November 5, 2001 1:43 PM