


Masterpage:Right-NoTitle0
EN
57
Filename [SR-VS30E_3-EN.fm]
Page 57 February 1, 2002 3:27 pm
A
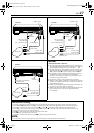
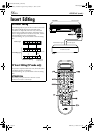
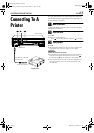
Make connections.
Connect the player’s VIDEO OUT or S-VIDEO OUT and
AUDIO OUT connectors to your recorder’s VIDEO or
S-VIDEO and AUDIO input connectors on the front
panel.
B
Set the recorder’s input mode.
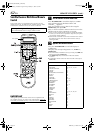
Press
AUX
(
number key
“
0
”) and/or
PR
to select “F-1”.
● When using the VHS deck as the recording deck, set “VHS F-1
INPUT” to “VIDEO” for the AUDIO/VIDEO input connectors,
or “S-VIDEO” for the AUDIO/S-VIDEO input connectors,
depending on the connectors being used. (
੬
pg. 53)
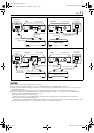
C
Select the recording deck.
Press
VHS
or
DV
.
● When using the DV deck as the recording deck, press so
that the video and audio signals from the VIDEO/S-VIDEO and
AUDIO L + R input connectors can be recorded. The dubbing
direction indicator ( VHS) lights.
D
Prepare the recording cassette.
For the VHS deck
Load the recording cassette into the VHS deck, and play
it back to determine the edit-out point (the end of the
segment to be replaced) using the
JOG
dial, or pressing
w
e
and
9
.
Then press
0000
to reset the counter.
For the DV deck
Load the recording cassette into the DV deck.
E
Locate the start point.
Determine the edit-in point (the beginning of the segment
to be replaced) using the
JOG
dial, or pressing
w
e
and
9
.
● Be sure to engage the Still mode at the edit-in point.
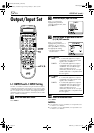
F
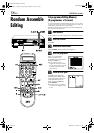
Engage the Insert Editing mode.
Press
INSERT
.
● Your recorder enters the Insert Pause mode. (“o
”, “
u
” and
“
i
” light up on the front display panel.)
● The TV screen changes from the still picture to the input
source you are going to record.
G
Start Editing.
Load the source cassette and play back the segment that
is to be inserted. When you reach the start of the section
of the source tape that you wish to insert, press
4
to start
the tape in your recorder; Insert Editing begins at this
point.
● “
o
” and “
u
” are displayed on the front display panel.
H
End Insert Editing.
For the VHS deck
At counter “0:00:00”, Insert Editing will stop
automatically while the tape continues running in the
Play mode. If you wish to stop Insert Editing before the
specified edit-out point, press
0000
.
For the DV deck
Press
8
to stop recording on the DV deck.
AV Insert Editing (VHS deck only)
If you want to replace the picture, Hi-Fi audio soundtrack
and normal audio soundtrack all at the same time ...
... In step
6
, after you press
INSERT
, press
A.DUB
also.
(
“
o
” and “
u
” blink and “
i
” lights up on the front display
panel.)
NOTES:
●
Once the Insert Editing starts, you can not use the other deck.
●
All necessary cables can be obtained from your dealer.
●
Insert Editing cannot be performed on a VHS (or S-VHS)
cassette that has had its record safety tab removed, or on a
Mini DV cassette that has had its erase protection switch set to
“SAVE”.
●
When Insert Editing is performed on a tape that has been
recorded on another video recorder, the inserted portion may
appear distorted.
●
In Insert Editing, the recording speed (SP/LP) is determined by
the previous recording to be replaced. If the previous
recording’s speed changes within a single edit, the inserted
picture will be distorted at the switching point. (VHS deck
only)
●
A small portion of the recording which precedes an insert edit
may become erased.
●
Insert Editing is also possible using the rear panel AV1 (L-1) IN/
OUT or AV2 (L-2) IN/DECODER connector. When using these
21-pin SCART connectors, be sure to select the correct input
mode (“L-1” or “L-2”) in step
3
.
●
Insert Editing is not possible using the DV IN/OUT connector.
●
Insert Editing is not possible on a blank portion of the tape.
SR-VS30E_1-EN.book Page 57 Friday, February 1, 2002 3:35 PM