


Page 11 July 17, 2003 8:53 am
— 11 —
Ⅵ AUTO TIMER — ON / OFF
● When this function is set to “ON”:
The timer recording standby mode is automatically engaged when
the recorder is turned off. It is temporarily canceled when the
recorder is turned on. You do not have to press # to engage or
disengage the timer recording standby mode.
● When this function is set to “OFF”:
You have to press # to engage or disengage the timer recording
standby mode.
Ⅵ O.S.D. — ON / OFF
When this function is set to “ON”, various recorder status
information (on-screen display) appears on the screen.
N
O
TE:
When you use this recorder as the source player for editing a tape,
be sure to set this function to “OFF”; otherwise, the recorder status
information (on-screen display) will be recorded on the edited
tape.
Ⅵ AUTO SP]LP TIMER — ON / OFF
When this function is set to “ON”, the recorder automatically
switches to LP mode to allow complete recording if there is not
enough tape to record the entire program while timer-recording in
SP mode.
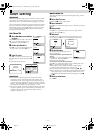
For Example, Recording a PAL-broadcast programme of 210
minutes in length onto a 180-minute tape.
NOTES:
● If you have programed the recorder to timer-record 2 or more
programs, do not use this function, but change the tape speed
manually during timer programing.
● There may be some noise and sound disturbance where the tape
speed switches from SP to LP mode on the tape.
● The Auto SP]LP Timer feature is not available during ITR
(Instant Timer Recording), and the feature will not work
properly with any tapes longer than E-180 or with some tapes of
shorter lengths.
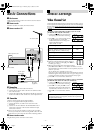
Editing
You can use your recorder as the playback or recording deck. You
can use a camcorder as the source player and your recorder as the
recording deck. Refer also to the other components’ instruction
manuals for connection and its operations.
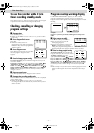
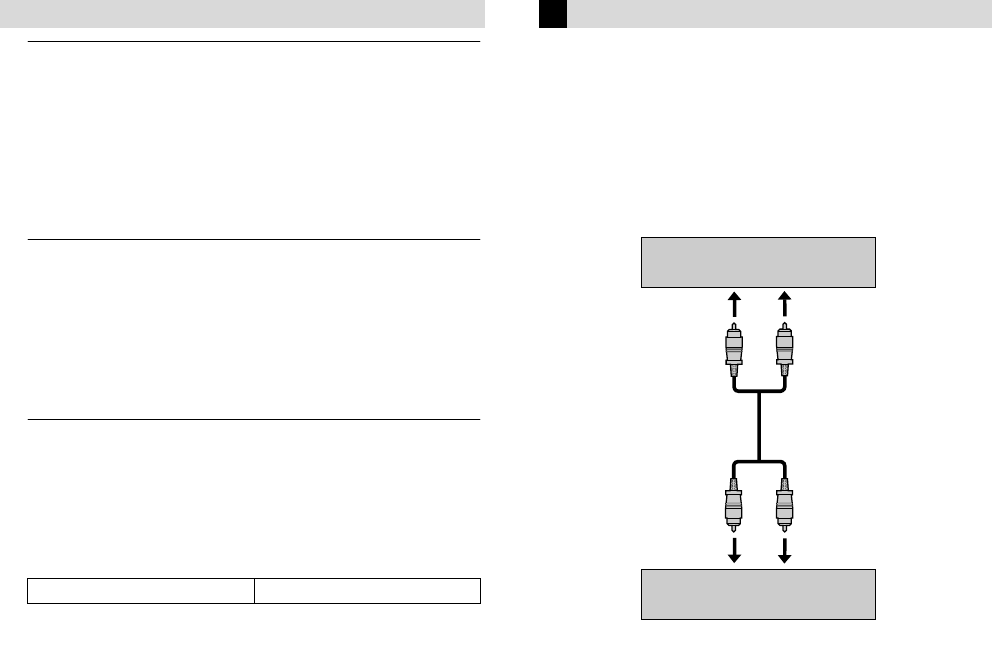
A
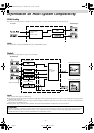
Make connections
Example: When using this recorder as the source player
● When using this recorder as the recording deck, connect this
recorder’s AV input connectors to the AV output connectors on
the other recorder. If the source player is monaural, connect the
audio output connector on the source player to the left audio
input connector on this recorder.
B
Load cassettes
Insert the playback cassette into the source player and the cassette
to be recorded on into the recording deck.
C
Select input mode on recording deck
Select the correct external input on the recording deck. Press AUX
or PR r/t on the remote control or PR +/– on the recorder.
On this recorder (when using this recorder as the recording deck);
Select “L-1” — when connecting the other recorder to the AV
input connectors on the rear panel.
(For HR-V400AG and HR-V401AS)
Select “F-1” — when connecting the other recorder to the AV
input connectors on the front panel.
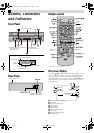
D
Select edit mode
Set the edit mode to “ON” for the recorders if such a mode is
equipped.
● On this recorder, set “PICTURE CONTROL” to “EDIT” (
੬
10).
E
Start playback
Press 4 on the source player.
F
Start recording
Press 7 on the recording deck.
Approximately 150 minutes Approximately 60 minutes
SP mode LP mode
Total 210 minutes
To AV input
This recorder (for playback)
Another recorder (for recording)
AV cable
(not supplied)
To AUDIO/VIDEO OUT
– Other Functions –
HR-V400AG-EN.fm Page 11 Thursday, July 17, 2003 8:53 AM