


16
1 2 : 3 0 : 4 5 3 H
1 1 – 6 – 1 9 9 9
3 H 1 2 : 3 0 : 4 5
1 1 – 6 – 1 9 9 9
1 1 – 6 – 1 9 9 9
3 H 1 2 : 3 0 : 4 5
1 1 – 6 – 19 9 9
1 2 : 3 0 : 4 5 3 H
4 MONITOR ON-SCREEN DISPLAY
Status information and other data including date/time, alarm input data, power loss (power failure) data and total operation
hours can be displayed on a connected monitor. Function settings can be switched via the on-screen function menu switches
and menu screens are also provided for timer recording program setting and date/time setting.
• Normally, the time/date data is shown on screen.
• Additional data displays and menu screens can be displayed by pressing the [MENU] button. This calls up the main menu
screen where you can select items as desired.
4-1 On-Screen Display in the Time/Date and Record Modes
Time/date and recording mode data is recorded and displayed on screen.
In the Stop, Record and Record Pause modes, data is superimposed on the input video signals.
• The on-screen display can switched ON/OFF using the <POSITION> switch in the function menu's ON SCREEN MODE
setting screen. You can also change the on-screen display position using this switch.
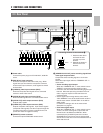
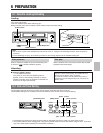
Menu switch
<POSITION> setting
Display
5 Connect the VCR's video output connector to the
monitor's video input connector.
Turn the power on (monitor and VCR).
• When a video signal is input to the video input
connector, time/date, and recording mode are
superimposed on the picture.
• If there is no signal input, display data is
superimposed on a black background.
* If the date and time have not been set, correct date
and time indications are not available.
5 If no on-screen data is displayed, set the <POSITION>
menu switch in the function menu's ON SCREEN MODE
setting screen to the desired position (except "OFF").
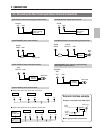
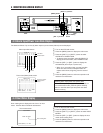
5 Changing the display position
You can select the position on screen where data is
displayed with the <POSITION> menu switch in the ON
SCREEN MODE setting screen. Data can be displayed
in any one of the four corners of the screen.
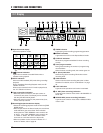
Setting of the menu switch <POSITION>
– L-UP : Left top (factory setting)
– R-UP : Right top
– R-BOTTOM : Right bottom
– L-BOTTOM : Left bottom
– OFF : Display is off. No indications are
shown.
● For "Function menu switch setting", refer to page 19.
• In the Record mode, on-screen time/date and
recording mode data is recorded together with video
signals.
If you do not want to record on-screen data, set the
<POSITION> menu switch to "OFF".
• In the Play mode, on-screen data recorded on the tape
is displayed.
• "L-UP"
• "R-UP"
Minute
Hour
Recording mode
Month
Second
• "R-BOTTOM"
• "L-BOTTOM"
Day
Year (last two digits)
Recording mode
Recording mode
Recording mode