


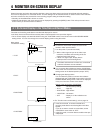


19
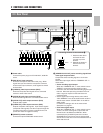
COUNT/
CLOCK
TIME
MODE
TIMER
REC
AL/PL
RESET
MENU
SHIFT/TRACKING
SET/V.LOCK
RESET
/CANCEL
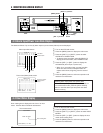
PAL
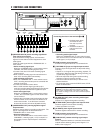
MAIN MENU
PROGRAM TIMER
FUNCTION
ALARM IN
POWER LOSS
HOUR METER
CLOCK ADJUST
PRESS (SHIFT, SET)
PRESS (MENU) TO END
A LARM / SENSOR REC MODE
(ALARM REC) OFF
(SENSOR REC) OFF
(DURATION) 180SEC
(BUZZER) OFF
(TAPE END MODE) STOP
PRESS (SHIFT, SET)
PRESS (MENU) TO END
ON SCREEN MODE
(POSITION) L –UP
PRESS (SHIFT, SET)
PRESS (MENU) TO END
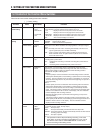
VTR MODE 1
(SHARPNESS) NORMAL
(VIDEO MODE) AUTO
(AUTO REC) OFF
(REC CHECK) NORMAL
(TAPE END MODE) REPEAT
(INDEX SEARCH) OFF
(CAMERA SW) OFF
(TAPE END BUZZER) OFF
(WARNING BUZZER) OFF
PRESS (SHIFT, SET)
PRESS (MENU) TO END
VTR MODE 2
(SUMMER TIME) OFF
(TAERMINAL SEL 1) SERIES
(TAERMINAL SEL 2) WARN
(REC REMAIN) OFF
(COUNT END) OFF
PRESS (SHIFT, SET)
PRESS (MENU) TO END
●
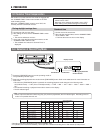
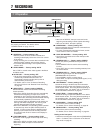
5 SETTING OF THE FUNCTION MENU SWITCHES
You can customize the VCR's functions to suit the requirements of your application using on-screen menu's function switches.
● Menu function switches are available on four setting screens: ON SCREEN MODE, VTR MODE 1, VTR MODE 2 and
ALARM/SENSOR REC mode. (When the optional SA-K97U RS-232C interface board is installed, the RS-232C
PARAMETER setting screen is also available.)
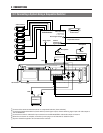
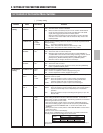
5-1 Function Menu Switch Setting
Normal screen
[MENU]
button
[MENU]
button
Main menu screen
On-screen mode setting VTR mode 1 setting VTR mode 2 setting
[MENU] button
[MENU] button
[SHIFT +] button
[SET –] button
[SET +] button
[SHIFT –] button
[SET
+/-]
buttons
• When the optional SA-K97U RS-232C interface
board is installed, the RS-232C PARAMETER
setting screen is also available.
• Select an item with the [SHIFT +/-] buttons.
• Enter the selected values with the [SET +/-] buttons.
Alarm/sensor recording
mode setting
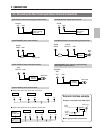
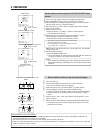
Ⅲ Press the [SHIFT +] or [SHIFT –] button to select the
item you want to set.
• When the cursor arrow reaches the last item (bottom of the
screen) pressing the [SHIFT +] button advances the
display to the next menu switch setting screen.
e.g.: (WARNING BUZZER)
[ (SUMMER TIME)
• When the cursor arrow is at the first item (top of the
screen), pressing the [SHIFT -] button will change the
display to the previous menu switch setting screen.
e.g.: (SHARPNESS)
[ (POSITION)
Press the [SET +] or [SET –] button to enter the selected
value.
Ⅲ To set more than one menu switch, repeat steps
6 and 7.
End menu switch setting.
Press the [MENU] button twice.
[ The normal screen is restored.
• Set values are stored in the VCR's memory. This
data is retained even when the power is turned off.
Preparation
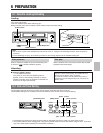
5 Connect the VCR's video output connector to the
monitor's video input connector.
5 Turn on the VCR and the monitor.
Press the [MENU] button to display the main menu.
Press the [SHIFT +] or [SHIFT –] button to select
FUNCTION.
Press the [SET +] or [SET –] button.
[ The ON SCREEN MODE setting screen is
displayed.
• Only one menu switch is available in the ON SCREEN
MODE setting screen. This switch (<POSITION>)
allows you to select the screen position of the on-
screen display and to switch it ON/OFF.
Press the [SET +] or [SET –] button to enter the selected
position.
To display another setting screen, press the [SHIFT +/–]
button.
• Press the [SHIFT +] button to display the VTR mode 1
setting screen.
• Press the [SHIFT –] button to display the alarm/sensor
recording mode setting screen.
The VTR mode 1, VTR mode 2 and alarm/sensor
recording mode setting screens include several menu
switches.