


46
206-4200
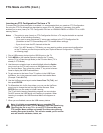
IP Environment
Prev.
Move
Network Setup
Offset Setup
Pro:Centric
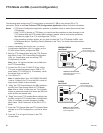
IP Environment
Prev.
Move
Network Setup
Offset Setup
Pro:Centric
IP Environment
Prev.
Move
Network Setup
Offset Setup
Pro:Centric
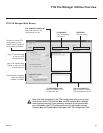
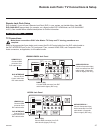
Mode
Media Type
Server IP
Port Number
Wake On Lan
Data Channel
Wake On RF
Wake On Time
Off
►
►
0 0 0 0
12 00
RF
0
Off
0
Off
:
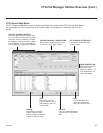
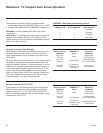
IP Environment Setup (Cont.)
Pro:Centric Setup
The Pro:Centric Menu options enable you to congure
Pro:Centric server settings in the TV. With Pro:Centric selected,
use the Up/Down arrow keys to navigate between elds.
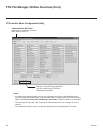
Note: Options that are initially grayed out/inaccessible in the
Pro:Centric Menu are dependent upon other settings in the
display. For example, if “IP” is selected in the Media Type eld,
the Server IP and Port Number elds become accessible.
Note: For those elds that permit direct entry of numerical values
(for example, Port Number, Data Channel, etc.), once you key in
the maximum number of digits allowed in the highlighted eld, the
next available eld will be highlighted.
AM
1. To enable/disable Pro:Centric application operation on a TV, use the Left/Right arrow keys on the
Installer Remote to select the appropriate setting—Off, FLASH, or GEM—in the Mode eld.
Note: If the mode has already been set in the Installer Menu (Installer Menu item 098 PRO:CENTRIC),
the specied mode will be reected in this eld. If you change the mode in this menu, Installer Menu
item 098 will now reect the value you entered here.
2. In the Media Type eld, use the Left/Right arrow keys to select IP or RF, as required.
Note: Setting the Media Type to “IP” automatically sets the Data Channel eld to “253.” You cannot
alter this setting (unless you revert to RF media). It is not possible to direct enter “253” in the Data
Channel eld.
3. (IP media only) Complete the Server IP and Port Number elds for TV E-Z Installation (splash screen,
conguration, and rmware) data. The Server IP must be an IPv4 multicast address within the
designated range of 224.0.0.0 to 239.255.255.255.
Either key in or use the Left/Right arrow keys to select the appropriate values in each eld. Note that
the port number (ve digits maximum) must match exactly the port number that has been set in the
Pro:Centric RF/IP Conguration display in the Admin Client (refer to the Pro:Centric™ Server Admin
Client User Guide for further information).
4. In the Wake On LAN field, use the Left/Right arrow keys to select On or Off, as required. The Wake On
LAN feature enables the TV to receive software updates via the LAN while the TV is in standby mode.
5. (RF media only) In the Data Channel eld, either key in or use the Left/Right arrow keys to select the
RF channel number of the data channel for Pro:Centric or E-Z Installation (splash screen, congura-
tion, or rmware) data. The data channel must be between 0 (disabled) and 135.
The TV may take several minutes to load EPG data after AC power is initially applied.
Note: If the data channel has already been set in the Installer Menu (Installer Menu item 119 DATA
CHANNEL), the specied channel will appear in this eld. If you change the data channel in this menu,
Installer Menu item 119 will now show the value you entered here.
6. (RF media only) In the Wake On RF eld, use the Left/Right arrow keys to select On or Off, as
required. The Wake On RF feature enables the TV to receive software updates via RF while the TV is
in standby mode. If you set Wake On RF to “On,” specify the appropriate Wake On time in the Wake On
Time eld. Note that the Wake On time is based on a 12-hour clock. Ensure the AM/PM specication is
set accordingly.
7. Once all elds are completed as required, press MENU to return to TV viewing, or press RETURN to
return to the previous menu level.