


Page
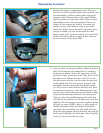
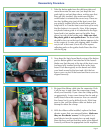
Remove the battery compartment cover. There are
four screws in this area that need to be removed. Two
are immediately visible on either side of the serial
number sticker. Remove them with a small Phillips
head screwdriver and set them aside. There are also
two hidden screws under the sticker (if there is no
sticker, all four screws are visible). To remove the
sticker, use an x-acto blade or razor to get under-
neath one of the corners and peel it up gently. Once
you get it started, you can use tweezers or small
pliers to peel it off. If you are careful, you can lift the
sticker and still be able to re-apply it later. Remove
the two screws and set them aside.
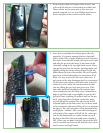
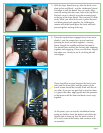
Now it is time to remove the black ‘rubberized’ back
plate. This looks like soft rubber but it is actually a
hard piece of plastic. Start at the top using a small
pry tool and pry up the left corner. Then, move to the
top right corner and pry that up as well. Once the
two top corners are free, you can move the pry tool
to the middle and, like a lever, bury it deeply and
pull gently forward, prying the back plate towards
you. This is not an exact science and you may need
to experiment and pry in a few different places. You
may also pry at the sides and use your hands to keep
the piece from locking itself back in its side groves.
There is a tab in the middle/center of the plate that
will offer some resistance so the plate may come free
suddenly. The only thing you need to really be aware
of is that, on some H900’s, there is a sticky piece of
double-sided tape at the very bottom of the plate
(just below the raised dot). So, if the plate seems to
come free but appears stuck in this area, use your pry
tool to ‘peel’ the plate off of the tape. Once the plate
is off, we can move to the next step.
.
.
Disassembly Procedure