


14
EN
I
NITIAL SETTING
Auto Channel Scan
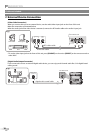
If you switch wires (e.g., between antenna and CATV) or if you move the
unit to a di erent area after the initial setting, or if you recover the DTV
channel you deleted, you will need to perform auto channel scan.
Before you begin:
Make sure if the unit is connected to antenna or cable.
1
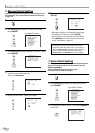
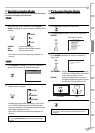
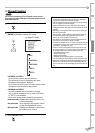
Press [SET-UP] to display the main menu.
2
Use [Cursor K/L] to select “CHANNEL SETUP”,
then press [ENTER].
e.g.) digital TV mode
or
– TV/VCR SETUP –
TIMER PROGRAMMING
SETTING CLOCK
CHANNEL SETUP
USER'S SETUP
V-CHIP SETUP
LANGUAGE [ENGLISH]
CAPTION [OFF]
ZERO RETURN
TIME SEARCH
INDEX SEARCH
DTV SETUP
B
3
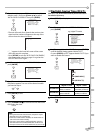
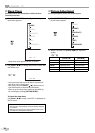
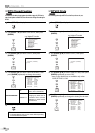
Use [Cursor K/L] to select your desired preset
type, then press [ENTER].
e.g.) digital TV mode
or
--- CHANNEL SETUP ---
ADD/DELETE (DTV)
AUTO PRESET CH (DTV)
AUTO PRESET CH (TV/DTV)
AUTO PRESET CH (CATV)
! CATV takes approx. 50min.
• When aerial antenna is connected, select “AUTO
PRESET CH (TV)”, “AUTO PRESET CH (DTV)” or “AUTO
PRESET CH (TV/DTV)”.
• When connected to CATV, select “AUTO PRESET CH
(CATV)”.
• Scanning and memorizing the channels automatically
start.
e.g.) digital TV mode
D25
AUTO PRESET CH(DTV)
• When the scanning and memorizing are completed,
the lowest memorized channel will be displayed.
• When you selected “AUTO PRESET CH (TV/DTV)”, the
lowest memorized analog channel will be displayed
when the scanning and memorizing are completed.
If there is no analog channel, the lowest memorized
digital channel will be displayed.
Note:
• If you connect the cable system directly, contact the CATV
installer.
• If you press [STANDBY-ON
y
] or [SET-UP] during “AUTO
PRESET CH”, the setting will be canceled.
• When no channel can be received by “AUTO PRESET CH”,
“NO TV SIGNALS” is displayed on the TV screen.
5
• Channel setting will be saved even if the power fails.
• If you have Spanish or French menus and need English,
press [SET-UP]. Use [Cursor K/L] to select “IDIOMA” or
“LANGAGE”. Press [ENTER] to select “ENGLISH”. Press
[SET-UP] to remove the main menu.
• With regard only to the digital channel, even after the scan-
ning is complete if you unplug the AC power cord before
turning off the unit by pressing [STANDBY-ON
y
y], the
channel setting may be lost.
Channel Add/Delete
The channel add/delete function lets you add the channel that was not
added by the auto channel scan due to the reception status at the initial
setting. You can also delete the unnecessary channels.
1
Follow steps 1 to 2 in “Auto Channel Scan“ on the left
column.
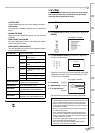
2
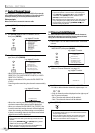
Use [Cursor K/L] to select “ADD/DELETE(DTV)” or
“ADD/DELETE”, then press [ENTER].
e.g.) digital TV mode
or
--- CHANNEL SETUP ---
ADD/DELETE (DTV)
AUTO PRESET CH (DTV)
AUTO PRESET CH (TV/DTV)
AUTO PRESET CH (CATV)
! CATV takes approx. 50min.
3
Select the channel you want to add or delete.
(Refer to “Channel Selection“ on page 15.)
e.g.) digital TV mode
ADD/DELETE : DTV
D25
4
Use [Cursor s / B] to select “ADD” or “DELETE”.
• To add or delete another channels, repeat steps 3-4.
or
• Color of channel number displayed at the right top of
the TV screen indicates;
- Blue: The selected channel will be added.
- Red: The selected channel will be deleted.
5
Press [SET-UP] to exit.
Note:
• In the digital mode (DTV), you can add or delete channels
only for major channel.
• Once you delete a DTV channel, you cannot recover the
channel without performing auto channel scan again.
(Refer to “Auto Channel Scan” on page 14.)
5
P77B1UT.indd 14 2007/09/21 13:21:36